Prius on-car throttle body service

The electronic throttle body on a Prius is quite easy to service, without opening the coolant path that helps heat the throttle throat. Thus, no need to drain and refill any engine coolant. The aim here is to keep all the parts of the motorized throttle body well lubricated so it doesn't stick closed, a somewhat common pattern problem on older cars.

These illustrations are from a second-generation '04, but the first-gen cars are very similar and the throttle body is almost identical. For reference and some design discussion, see the throttle body teardown and compare that assembly from an '02. In general, these units are about as beautifully simple as a throttle body can get -- one butterfly valve, a position sensor, and a few easy hoses. And the coolant line, which is perhaps the oddest thing about it but a completely sensible approach to prevent icing up in the winter. Far cry from the ol' four-barrel carbs with numerous bypass passages, needles, gaskets, floats, jets, diaphragms, screens, and a hundred other fiddly bits that we used to rebuild.

Small pictures are linked to larger versions.


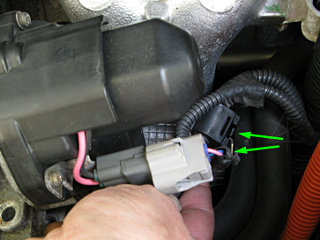
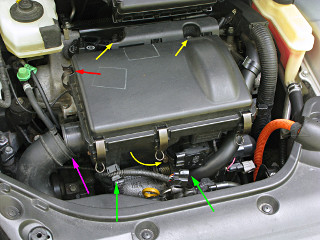
air box cover, and what bolts to remove The MAF and intake temp-sensor cable [green arrows] must be disconnected. If you spaced and left the car powered up during this you'll get an immediate error code, so obviously all this has to be done with the car powered down. Slipping a small screwdriver into the slot in the grey cable clamp will allow it to open easily and release the harness.

If you still have your intake snorkel [pink arrow], loosen the ring clamp bolt and slide the hose off the airbox flange. I don't even know where my clamp is anymore because that whole snorkel assembly has been OUT of my car for about five years now and I had to go find it just for the picture.

It's not even necessary to take off the airbox cover to remove the entire assembly, but if you do watch your fingers when opening the one side clip [red arrow]. The lower hinge of it can give a nasty nip if your finger is next to it when unclipping. If you haven't inspected the air filter in a while and at least knocked the loose dirt out of it, now might be a good time. With proper care and occasional application of a vacuum to the dirty side, the filters can last a very long time. At almost 160K I'm on my second one, and probably could have stayed on the original.

Remove the two top 10mm bolts [yellow arrows]. The bolt underneath [curved yellow arrow] loosens another band clamp around the bottom neck of the air box. Now the whole airbox unit just lifts up off the throttle body flange. Note the construction of the collar that connects the two -- the hose clamp is specific to this application, and has a little alignment hole matching a right-angle tit on the rubber collar. Now would be a good time to clean and lubricate the hose clamp screw, because it tends to become corroded and stiff.

Might be a convenient time to clean the MAF, too!
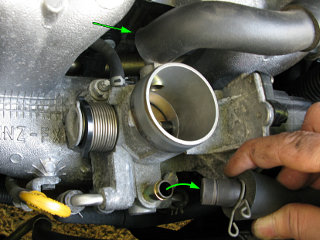

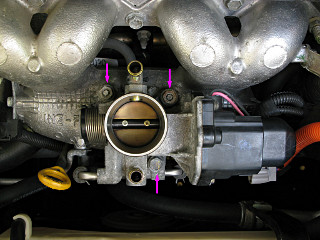
PCV and crankcase inlet hoses Disconnect the two fat crankcase venting hoses. One has a snap ring, the other doesn't. They're only fat because of the foam padding. Keep track of which one is which, as the two throttle-body fittings go to different places. The forward one is from the PCV valve and comes in under the throttle flap where there's vacuum.

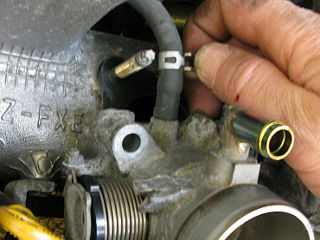
3 throttle body bolts The throttle body is attached with three obvious fasteners, two of which are nuts onto studs and the third is a regular bolt. To the left and right of the lower [forward] bolt are the two coolant-line hose fittings -- do *not* take those off, as doing so would let coolant leak out. The point of this is to get to the throttle body without disconnecting those.

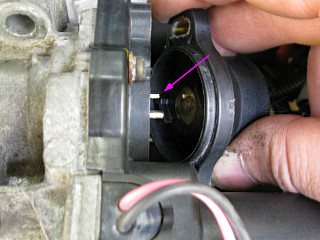
Movement of the throttle flap can be tested by grabbing the black plastic arm to the left of the spring and physically turning the shaft. There's a little bit of resistance from the spring and gear train and inertial "heaviness" from the motor, but it should not be inordinately stiff or grindey-feeling. And there should be NO feeling of "sudden release" as the flap first starts to open, which would be symptomatic of the butterfly edge gummed up and sticking mostly-closed.

*Note:   For routine throttle maintenance, we can almost just stop here. Every so often a small drop of medium-weight oil on the pivot shaft at the left and right edges of the butterfly helps keep the shaft moving freely, and from here we can also wipe the edges of the butterfly valve and the nearby throat area clean. That's really all that is needed for a yearly or so inspection. The only reason to continue this procedure is to inspect the drive motor and gear train, and like I said it's been 5-ish years since I was in here which is why this page was put together so much later on than earlier service articles.

To proceed, remove the three 12mm fasteners. Keep your work area clean, as we don't want to drop crud into the intake that might violently disagree with the engine's breathing needs later.

If you can get to the small vacuum hose going off the back of the throat, either remove it now or wait until the body moves and it's easier to access.


tps/etcs wire harness retainer clip Here's another cable clip that must be released. Instead of a screwdriver slot, this one has a little snap-tab that locks the black plastic fitting onto a metal bracket attached to the engine. Slide the entire thing off toward you and let it hang.

underside of throttle body w/ gasket Carefully "crack" the throttle body loose from the intake plenum by gently twisting and rocking upward. The gasket should come cleanly away from one face or the other with a little persuasion. The gasket is metal with rubberized faces, and can be re-used if it isn't mangled. [If you're paranoid that it'll be hopelessly stuck down, go get a new gasket at your local Toyota parts counter before tackling this.]

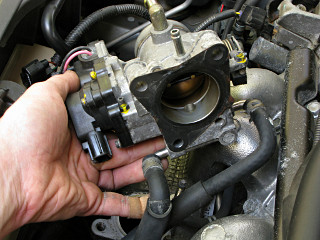
Now it's easy to disconnect the position-sensor and motor drive connectors.

The two coolant hoses will trail along behind the throttle body as it's lifted and turned about, and there's plenty of play to allow a fairly free range of motion. Once the throttle body is separated, the gasket can be removed completely from whichever half it's still stuck to and set aside. Clean all the mating surfaces, and check for any corrosion bad enough to cause a vacuum leak.


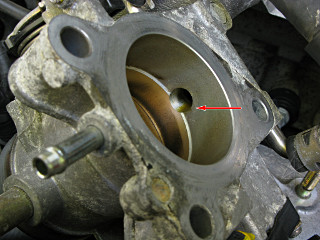
PCV inlet is likely source of oil fog Here we see strong evidence that the PCV inlet, which is *under* the throttle valve and therefore subject to vacuum, is the most likely source of the shallow "oil sump" we always find in the bottom of the intake tract. This is completely normal. No PCV vapor trap is perfect, there's always a little oil fog that gets pulled in and mostly burned but the Prius intake geometry is such a gravitational dead-end, not all the oil gets pulled into the engine.

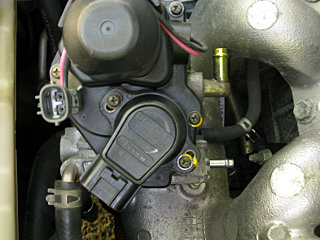
TPS alignment, screw slots Turn the body sideways to look at the motor and position-sensor screws. Take careful note of where the two position-sensor screws are relative to their slotted holes, and make new matchmarks if you like. The TPS must be set as exactly as possible back to this position on reassembly, or the car's notion of "idle level" will be thrown off. For some reason it does not re-learn, at least not readily or right away, for a changed sensor alignment. And as far as anyone knows there's no diagnostic command to recalibrate TPS zero-point from scratch.

Remove the position sensor, revealing the fourth motor-housing screw, and then the motor cover.


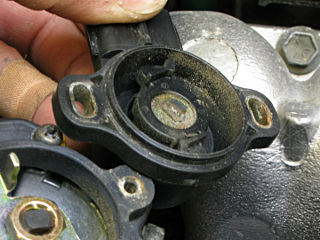
cruft in the TPS housing Interesting ... there appears to be a little bit of cruft inside my TPS housing. Well, it doesn't have a perfect seal and the prior winter had my whole engine bay possibly the filthiest it's ever been before getting its routine hosing-out in the spring. But none of that got into the sensor pot bearing, which still turns freely. This wants a gentle wipe-out with a rag or Q-tip. Spraying anything into here is probably a bad idea.

Note that the sensor has its own independent return spring inside.


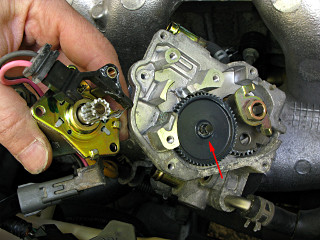
ETCS gear train Now we can dismount the motor and then look at the geartrain, wipe out any crud, and get a little fresh grease smeared around on the teeth and intermediate shaft. The motor rotation feels perfect here; there's no good way to lubricate the motor itself anyway.

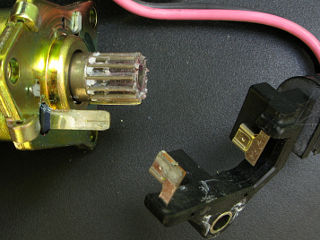
slight motor contact corrosion Aha: a little corrosion starting on one of the motor contacts. Nothing a little wipedown with De-Oxit and re-seating won't restore the youth of. But it's interesting to note how moisture can have effects even in a fairly well-protected area like this. Electrolytic interaction between slightly dissimilar metals may also contribute, as there are substantial DC currents going through here during operation.

After various cleaning and regreasing, that's all we have to do and reassembly can proceed!


reinstalling TPS to butterfly fork When reinstalling the TPS, make sure the actuator fork lands on the correct sides of the plastic "tee" that connects the potentiometer shaft. The fork turns the pot against its return spring. This may need a little fiddling to get right; start by aligning one side and then bring the TPS housing up into place before rotating toward where the mounting slots line up with the screw holes.

rear-side vacuum hose Make sure to reconnect that vacuum hose on the back! That goes to the evap system, without which you don't pass emissions inspection.

Don't wail down on the main air-box hose clamp too hard, especially if you've lubed up its worm screw in the meantime. It takes very little torque to tighten that connection correctly; if you see rubber bulging anywhere around the clamp, back off some.


Once everything's back together, test startup. You may have to clear an error code anyway, if the TPS rests in a slightly different place than it did before. This isn't a problem; the condition will self-clear and turn the check-engine light off after four reboots of the car just like with any other transient error, so you don't need a scantool to do that.

Going to Neutral during that first-minute warmup phase should not significantly change engine idle level -- it might bump up or down a little, but it shouldn't start revving or stumbling too far from its 1000-RPM or so baseline. If it does, you'll probably want to pull things apart again enough to realign the TPS. If you have *just* the right length of phillips screwdriver you might be able to do it in-place, but it'll be by-feel guesswork in a mighty tight workspace.

Bob Wilson also offers some throttle service advice, using commercial cleaning products. I'm personally a little leery about such things when there's just not that much dirt to deal with, and would rather have the satisfaction of up-close component inspection instead of a relatively blind "spray-n-pray" approach.


_H*   110609