 We used a piece of TV coax, which is one of the nastier examples for
stiffness and general misbehavior. We figured that if you can successfully
flip-coil this stuff, you can handle anything else -- even heavy stage-pin
cables and sound snakes.
We used a piece of TV coax, which is one of the nastier examples for
stiffness and general misbehavior. We figured that if you can successfully
flip-coil this stuff, you can handle anything else -- even heavy stage-pin
cables and sound snakes.
--->
NEVER arm-wind cables around your hand and elbow, period.
--->
And don't let other people do it. Teach them this method
--->
instead, and they'll be much happier in the long run.
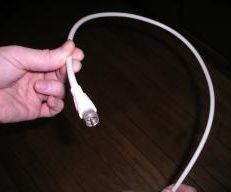
This attempts to show just one of the methods. There are some different variants, such as having the cable coming into the near side instead of the far side of the coil, but the basic idea is always the same. Successive loops of a coil lie alternately over and under each other -- the net effect is that the cable doesn't develop any twist. When cable is pulled off the end of such a roll, it won't make those annoying side-hanging loops and knots that take forever to work out. And it does take some practice -- so get some cable, such as an extension cord, and follow along! Try a few different hand movements to find what works most comfortably for you; as long as the CABLE keeps doing the right thing as you work on developing speed, you can go about it however you like. If you're a lefty, you will probably want to reverse hands and accumulate into your right one.
We used a piece of TV coax, which is one of the nastier examples for
stiffness and general misbehavior. We figured that if you can successfully
flip-coil this stuff, you can handle anything else -- even heavy stage-pin
cables and sound snakes.
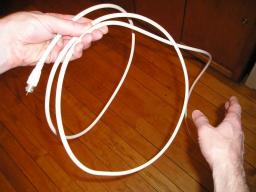
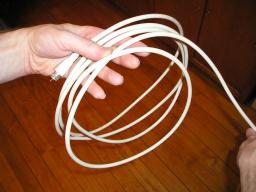
Hold one end of the cable in your receiving hand, and grab another part
about 2 feet away farther down the cable.
.
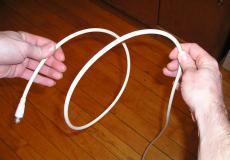 Make the first coil normally by bringing your hands straight together,
and accumulate that coil in your holding hand. Rotating both wrists
slightly counterclockwise will help the cable bend the right direction.
Let the cable spin in your hands to form a nice round first loop.
Make the first coil normally by bringing your hands straight together,
and accumulate that coil in your holding hand. Rotating both wrists
slightly counterclockwise will help the cable bend the right direction.
Let the cable spin in your hands to form a nice round first loop.
.
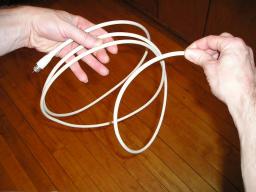
 Grab another piece 2 feet away, but as you bring this one in rotate your
wrist clockwise to invert the loop as it forms. It often helps to also
roll the cable slightly between your thumb and fingers, to better guide it
into flopping the right way. If the loop starts to twist funny or try to
figure-8 on you as it forms, twisting the cable in your fingers helps to
flatten out the loop.
Grab another piece 2 feet away, but as you bring this one in rotate your
wrist clockwise to invert the loop as it forms. It often helps to also
roll the cable slightly between your thumb and fingers, to better guide it
into flopping the right way. If the loop starts to twist funny or try to
figure-8 on you as it forms, twisting the cable in your fingers helps to
flatten out the loop.
.
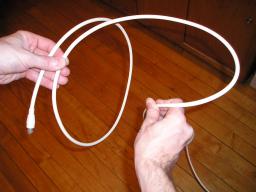
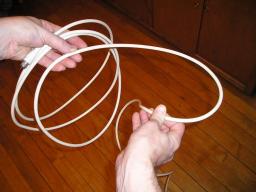
 Add this inverted loop to your bundle. The part that heads for the floor
should pass UNDER the loop you're just making -- this is the key ...
Add this inverted loop to your bundle. The part that heads for the floor
should pass UNDER the loop you're just making -- this is the key ...
.
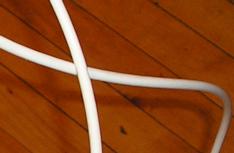 as shown in this [badly-lit] detail of where they cross.
.
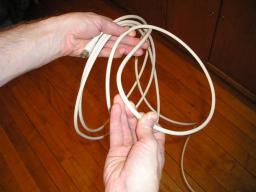
 This is your first "flipped" loop. It may look and feel a little wonky,
but this is exactly what you want. Now, if you look carefully at the rest
of this particular cable going toward the floor, you may be able to tell that
its twist will lend itself to coming up in a "normal" non-flipped loop. So
reach for that next bit ...
This is your first "flipped" loop. It may look and feel a little wonky,
but this is exactly what you want. Now, if you look carefully at the rest
of this particular cable going toward the floor, you may be able to tell that
its twist will lend itself to coming up in a "normal" non-flipped loop. So
reach for that next bit ...
.
 and make another straight-in loop.
.
 Next comes another flipped loop. Grab the next part and rotate the wrist
to invert the coil underneath ...
Next comes another flipped loop. Grab the next part and rotate the wrist
to invert the coil underneath ...
.
 and add it to the bundle. This is a slightly better picture of what the
"under" loop looks like.
and add it to the bundle. This is a slightly better picture of what the
"under" loop looks like.
.
 Next comes a normal straight-in loop, and then an under loop, etc etc.
Just keep going that way -- over, under, over, under ... until the cable
is finished. Tie off with a square-knot bow, just like tying shoelaces,
with the tie-line that's on one end [there IS one already clove-hitched to
one end of the cable, right??] with the cable ends hanging out past the
tie a short distance.
Next comes a normal straight-in loop, and then an under loop, etc etc.
Just keep going that way -- over, under, over, under ... until the cable
is finished. Tie off with a square-knot bow, just like tying shoelaces,
with the tie-line that's on one end [there IS one already clove-hitched to
one end of the cable, right??] with the cable ends hanging out past the
tie a short distance.
.
Huge Caveat: Once a cable is coiled this way, either end must be uncoiled again from the SAME side of the roll, or the result is a series of overhand knots -- one for every inverted loop in the roll. You cannot rely on a particular cable end pointing clockwise or counterclockwise, because someone else may have flip-coiled it the other way round, so you just have to check. Pick off one end and one or two of the coils connected to it, and look at where that feeds from. If it appears to be coming out of the CENTER of the coil, you have it on the wrong side -- pass that end back through the middle of the coil, and that should now be the correct side to feed off from. If you get used to examining the roll to make sure you've got the free end on the correct side before slinging the rest, you'll never have the knots problem. This takes a little practice too, but once you've got it you will never forget.
One fast way to unsnarl a bad tangle is to begin flip-coiling from any free end, and pass your entire bundle through any tangles and knots you run into such that you're back-following where the cable winds through the mess. This is much faster than trying to pull ends all the way through and out, with less risk of kinking and yanking on connectors. If the cable is badly twisted, you can always stop and use both hands alternately to spin the entire accumulated roll opposite the twist to straighten a short piece of cable, and then keep rolling. You'll have the whole thing neatly coiled in your hand in no time. Some cables that have been abused may take a bit of re-training to actually be non-twisted in the first place. Uncoiling and flip-coiling a few times and helping the free end untwist as you work toward it is one good way. You can also stretch the wire way out across a large floor and then coil from there.
Large, heavy cables like feeder or Soco multis should be flip-coiled too, but it may be easier to lay the coil down on the floor instead of trying to hold it all up in one hand. The loops will be larger, but the principle is the same. Turn every other loop around underneath as you pull it in, and the next person to use that cable will be very happy with your work.
Some shops insist on straight-in coiling, and refuse to listen to reason. If after being pointed at this or other references they are still resolute about that, it may be the better part of valor to just do it their way even if you KNOW it's wrong and are doing so under duress. Part of their reasoning may be the "knots problem", but they may not know how to avoid it in flip-coiled cables. Here's your chance to educate.
All Wrapped Up! -- a slight variant on the above method, with a different hand twist.
Cables: Tangle Free [Internet Sound Institute] -- hand-drawn pictures, showing the cable as a ribbon, but unfortunately not showing the under-wrap part clearly.
A cool little movie [in various formats] in which Chris Babbie demonstrates his variation. While they are not specifically talked about, here you can see some of the other little subtle motions that come from long practice -- the quick shaking or rotating motions to get coils to lay flatter, occasionally dropping and re-grabbing a loop when it's not coming in right. Study this one a few times if you're having trouble getting it.
www.controlbooth.com/postp176.html was a forum discussion on the topic, that now appears dead. But Controlbooth is a great resource in general.
When in doubt, google. Plug in words/phrases like "over under" and "cable" and "coil" and "wrap" and you'll get many more hits.
_H* 040209, minor tweaks 100122
[*Note: This is one of my earliest webpages, after learning just enough about HTML to royally screw it up. Original format left intact just to amuse those who care. Webpage source should *still* be human-readable, however, which has definitely become a lost art in the age of all these idiotic page-composition tools whose writers never heard of a newline.]