
| With most of the house furred up, it was time to start on the siding. This would complete the rainscreen structure, theoretically making it so that any water that reached the drainage plane at the foam would only be due to some extreme conditions. Well, we'd see how that would play out, given how we'd already seen that various parts of this setup weren't necessarily 100% watertight. |
Day 15
|
|
This is what we got. Generic vinyl siding, fairly easy to work with and basically zero-maintenance. I got a slight ribbing from the builders, who were like "ya shoulda gone with HardiPlank!" or some other cement-board type that appears to be in such vogue now. Well, I'd heard about some issues with that stuff -- actually needing paint jobs after not too many years, fading or chalking color, and when you look at how it's usually installed there is not a whole lot of overlap to prevent wind-blown rain from potentially blowing or capillarying its way right between the laps. Vinyl fully interlocks the courses all the way up, leaving a few weep holes here and there, and you'd have to hose it down pretty hard to get a lot of bulk water behind it. Okay, so maybe my siding was kind of trailer-park compared to the perceived quality of the other materials on the job, but it was my choice for a bunch of reasons. |

|
They set up a siding cutting station, on a long plank with appropriate spacers to hold long pieces straight on either side. They turned the blade backward in the saw, a trick I wasn't aware of previously but is fairly common to make cleaner cuts in vinyl. The downside of the reverse blade is that it *screams* like a cloud of giant mosquitoes from hell when used, but there was enough noise around the site anyway that it wasn't going to be anything unusual. |

|
Obviously the stock starter-strip that came with the siding would be completely inadequate on this job. |

|
Instead, one guy was over at the brake custom-bending a bunch of larger
starter-strip that would cover the cor-a-vent and screen and give a
generous area to nail into the furring. This was mounted so that the
edges of it and the under-foam metal behind were approximately at the
same height, leaving an inch-and-a-half or so air/water gap between
them bridged by the bug screen.
A couple of siding work clues were passed between guys at this point, such as "don't put nails right above each other to avoid splitting the strapping". But there's less choice at a butt seam where more nails have go in. |

|
A lot of trim parts made from coil stock received folded-back hems, for a cleaner and stiffer visible edge. Here's the right way to hem a long piece: make a sharp bend of the correct dimension, and then take it out and drop it back into the top of the brake like this, bringing the bending jaw all the way up and over to crimp the edge nice and tight. Takes about 20 extra seconds. |

|
The very first piece of siding went on. It clipped onto their custom
starter strip quite nicely.
The color gradient I've used as the background of all these pages should start to make sense right about now. Remember what color the house used to be?? |

|
Corner posts and J-channel had to be installed ahead of where
the siding would go in. Here they'd worked some J around the basement
bulkhead. This sort of shows how J-channel gets flashed -- a little tab
is cut out of the middle and bent down over the vertical piece. Everyone
was carrying large shears that day, because siding work involves thousands
of little slits, trims, and snip-offs of material to work around wall
features.
Upon asking just for the sake of a sanity-check, I was told that the siding itself typically gets gets loose-nailed to accomodate expansion but all the supporting stuff like J-channel and trim gets nailed tight. This conflicts somewhat with the printed instruction sheet that came with the siding, which for J-channel says "just until flush" and I'd argue that this is a bit more. Other areas were nailed even tighter than here. Probably insignificant for relatively short pieces... |

|
After watching what the rain had been doing on the soffit pieces and thinking
about the trim metal yet to be installed on the fascia, an idea occurred
to me. The guys were intending to do the usual simple right-angle bend
up under the outer soffit edge, and on thinking about it I saw a potential
water path via capillary action and a way to prevent it. I doodled up a
pair of drawings and floated the idea to the Q&A section over at
Green Building Advisor, asking if it was worth even considering.
The idea was that water running down the trim metal [green] could connect up via contact with the soffit material [blue] and run inward toward the house wall. |

|
The proposed fix was a simple extra small bend downward, forming a drip
edge far away from the soffit to definitively shed water before it could
wick upward.
Martin Holladay over at GBA seemed to approve of it as a nice detail, so I figured I had come up with a winner. I passed the idea to the GC who forwarded it on to the PM as something to possibly try. |

|
The PM seemed a bit skeptical and held that the simple right-angle they do all the time never caused a problem with mis-directed water, but he was willing to give it a try as I think it appealed to his inner building-science geek a little bit. He penciled up the proposed "kicker" bend and its installation right on their utility table to make sure we were both thinking of the same thing. |

|
A couple of test pieces were bent up in the modified style.
What I hadn't realized before was that they always hem the visible edges, which would make water-transfer characteristics a little different in the first place. |

|
They attached these along the shed dormer fascia, and it looked like it would work quite nicely and be a simple change. |

|
Since one of today's projects was to get trim metal on the cheek-wall returns, he went to try incorporating the "kicker" trim there. The pieces cut for this were a little more complex to fit over the shadow boards and close off the box, but it looked like it might work here too. |

|
Until he tried to turn the corner and carry the idea through. He couldn't
get this to match up in a nice 45-degree line and not look like ass or
leave a big gap between the pieces, simply because the angles at the
downward-bending part were too weird and corners weren't something
I'd considered during my theoretical noodling.
He *wanted* this to work, and continued fiddling with it for another hour and a half or so. Watching him thrash on this one corner made me sort of sorry I'd ever proposed the idea. Eventually, we gave up and went back to the traditional right-angle. Very fancy snip and bending work might have gotten this together, but they needed to move on and actually get the trim done. I also realized that the non-zero-width hemmed edge would inherently help water stay off the soffit -- not only that, but the whole right-angle fascia piece could simply be bent down another eighth-inch or so and make a non-contact gap away from the soffit anyway. |

|
Once freed from the constraint of trying to make the kicker-edge work, everyone could go ahead and trim started to go on really quickly. Here's that nice Japanese hand saw again, doing some minor shaping on the framed box so the metal would go on nice and flat. |

|

|
|
The trim metal necessarily has some exposed fasteners, and it's aluminum,
and the whole assembly needs to be unaffected by water.
For the sake of appearance and avoidance of dissimilar-metal corrosion,
these tiny little white-coated aluminum nails are used. If someone's being
attentive to detail, the nail holes all get pre-drilled to avoid dimpling
the metal.
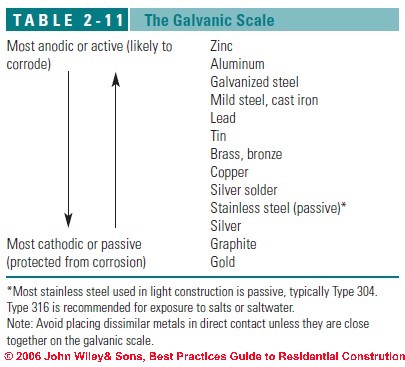
Note that despite common application on construction sites, stainless steel fasteners are NOT a solution because they're pretty far away from aluminum on the galvanic scale (jpg). This is often overlooked when contractors are grabbing a handful of, say, pop-rivets [quite a few of which were used on the sill flashing here] which come in both aluminum and stainless and are not easy to tell apart. | |

|
Trim was first put around the windows and other features and then the siding was worked up the rear wall fairly fast, each piece clicking solidly into the one below and getting carefully nailed in with the nail heads floating just clear of the flange to allow movement. |

|
Cute little squares of J-channel were placed around where my vent pipe attachment blocks would sit, aligned nicely right over the PVC pipes. |

|
The west wall was getting sided at the same time, and the guy working it almost forgot about accomodating the electric meter box in a similar way. I brought it out to him so he could determine an appropriate size. |

|
He J-channeled a generous area and added a bunch of strapping, including
a fairly solid run all the way up to the rake, to mount the box and its
feed-wire clips to. A large Azek block would fit into the opening.
For some reason he left out a piece of strapping where it looked like it would fit, and didn't uniformly fill the space down toward the bottom. Since some of this necessarily had to just go into sheathing instead of studs, perhaps he didn't want to overdo it with the mid-field screws. |
|
Today was punctuated by the arrival of someone to fix the loose window
latches.
There's some background on this: after noticing several stripped screws I called Serious for suggestions, since some of the fiberglass parts they were into are quite thin and I didn't want to just go slamming bigger screws into there and risk damaging something. They pointed me at Pinnacle, who was the intermediate supplier the GC had ordered the windows through, and they seemed concerned enough to send a guy out all the way from their office in Maine to handle the problem in an official, within-warranty fashion. |

|

|
| The idea was to re-use the same screws, to avoid ugliness with larger ones, and get extra material into the holes to basically re-establish stronger threads. The method was deceptively simple and common but I would never have thought to try it on fiberglass: break off little slivers of wood and fill the hole with them and some caulk, re-mount the hardware, and leave it all alone to cure. It wasn't even any particular special caulk, just some generic silicone-based stuff. Hopefully reinserting the screw woudn't put excessive outward pressure on the framing components -- I didn't see anything untoward about it, and this stuff is far tougher than vinyl. [Now, why don't they make siding out of fiberglass...] | |

|
As long as he was here, I asked if he'd also be willing to remove the equalizer bags in whatever the approved fashion was. He was, and we looked at the various type of diagonal cutters I had kicking around and he selected one he thought would be ideal. The instruction label specified a whole inch between crimps, which would have left a lot of the tube hanging out needing to be stuffed into the frame somehow ... he said nobody even tries to do that, so he put all the crimps and the final cut much closer to the origin point. I'm sure the effect is the same. |

|
Once some bags were freed up I could have a close look at the tubing. It is quite small -- I'm holding a pin here -- but not ridiculous, and it's not clear that a squash crimp in this has any hope of being a really gas-tight seal. There's no guarantee the gas mix won't eventually leak out from thermal cycles over the long haul anyway, either through the tubing or just the seals around the panes. Best I can do is watch for diminishing thermal performance and/or more condensation. |

|
It required a somewhat sensitive touch on the cutters to make the difference between a proper crimp and just chopping the tube off. |

|
On one of the large front windows he tipped the sash out and removed it completely, which requires a bit of fiddly hinge-pin alignment to get back in properly. He forced this a little too hard and managed to bend the pin. Fortunately not in a destructive way that I couldn't bend back straight and then seat into the counterweight spring fitting the correct way, but it's a subtle difference and he hadn't even realized anything was mucked up. |

|
In the meantime, siding had progressed a good way up the back and side. |

|
It was interesting to observe a few different ways to turn an angle with J-channel. With a pair of snips, vinyl siding becomes quite the versatile medium. It's also pretty easy to bend while fitting into weird constraints. |

|
Dubious attempt at an art-shot, off one of the scaffolds. |

|
As they reached the top of the back wall, the pieces to go in over the windows were a fairly narrow custom cut but they still had plenty of space to work in. Even the two-foot overhang had left a reasonable margin. |

|
It was a little fiddly getting it in there, but it eventually clicked in. They'd snapped it up into an extra padding piece of under-sill trim, which they figured would clip and hold a bare cut edge fairly firmly. |

|
In examining all this later, trying to get more understanding of how it all goes together, I realized that the top piece wasn't actually fastened to anything and could slip right back down fairly easily. This actually became a problem later in the project when ladders placed against the ends of this topmost course made them drop out and sag, and that's when I finally popped in a couple of small screws near the outer corners. |
After the whole
project was over I happened to glance back at the instructions and found
the way the factory suggested dealing with this, using a tool the guys
probably didn't have with them:
"Punch the top panel with a snap lock punch ... every six inches.  The raised
material should be on the outside face. ... push top edge into the undersill
trim.  The raised slots will catch and hold the panel firmly in place.
So basically they were supposed to form a few little plastic claws that would lock into the undersill stuff, but here simply relied on friction. | |

|
I grabbed some scrap metal and my own shears and spent a little while trying to model the failed "kicker corner" on a smaller scale, and actually did come up with something except that it didn't include hems. Heck with it, I thought, what's done is done and if water turned out to be jumping the gap I'd just bend it down a little later. |
| The roofer visited that afternoon as well, to get measurements and talk about colors and materials and underlayments and whatever else. It was another "magical moment" in project logistics because he came at *just* the right moment to intervene slightly in the rear siding and ask the guys to deliberately leave little spots open for him next to the wing-wall returns, seen here. There were a couple of areas that couldn't really get sided until after the roofing was down and everything could be flashed in. | |

|
An experimental pull at the stick-on labels on some of the windows showed that they weren't going to peel off cleanly, not in the slightest. About the only way to get them completely off was acetone and a bunch of scraping. As of the time I wrote this paragraph, a couple of months later, I still hadn't gotten all the labels off because it became such a pain in the ass as well as needing nice weather to be able to ventilate the vapors away. |
Day 16

|
The next morning was a little cooler, and I spotted a dew pattern on the roof Grace that clearly showed where the foam ended and the open soffit began. Interesting. |

|
One of today's projects would be to pull the front door out again, fix up the flashing around it, and reinstall it "for real". The PM had an idea to trim the frame down a little and make it fit the opening a little better. |

|

|
| It fought them every step of the way on removal, but they finally managed to tip it out of there. | |

|
This time I got a good look at the bottom of the frame. Residual dampness from the water issues, and the remains of retaining straps it had from its original mounting, but basically a sound door unit and still worth keeping. |

|

|
| Because the previous installation had managed to spread the frame itself a little, adding reinforcement to back up the old nails seemed like a good idea. After the door went in the last time I wound up backing their screws out just a little and prying the frame back together to make the door close tighter -- my minor griping about that was probably one of the motivators for the PM wanting to pull it and redo it. | |

|

|
| The shaving-down operation must have been pretty rough on the saw, with sparks a-flyin' from some of the old nails. The guy set a shallow angle on the blade for sort of a tapered cut that would hopefully let the top of the door clear the framing as it was tilted. | |

|
He got a kind of raggedy rip off the top and then trimmed it up with a chisel. It was a little ugly but likely to work as needed. All this was going to get hidden again; it was really just to ensure that the frame would go back into the opening without catching on stuff. |

|
The "reinforcement" framing that had been added underneath two weeks ago was already kind of mysteriously ratty, possibly from the water. |

|
This time it got done much stronger, with some vertical blocking underneath sitting down onto the sill and attached to the joists. |

|
New framing in place, nice and straight now. One piece of the old stuff was deemed okay as is, but also got reinforcing blocks inserted underneath. |

|

|
| Flashing went down and a site-bent metal sill pan got laid in over it, and a whole festival of various caulking happened as the door was placed back in the opening. | |

|
They took the door itself off the hinges, and did full level-n-plumb shimming on the frame like on the side door. The backing shims firmly in place would also keep the screws from pulling on the frame again. |

|
A tiny bit of adjustment was needed to restore proper non-binding door operation, and it was in. My threshold water-deflector was even still intact. The typical gaps surrounded the frame, again closed temporarily with foam rod and would get fully sealed up and cased later on. |

|
Closing gaps was aided by the addition of some first pieces of trim metal
on the outside; this would possibly also help resist water.
It felt like this particular door became a pain in the butt through various stages of the project, and I began questioning the wisdom of not just getting a new one. The guys seemed to just take it all in stride, though; they work with what they've got. |
_H* 121203