House energy retrofit 04

    A moment of reflection

Around this time I had ticked quite a few things off the to-do list, and it was all seeming far less insurmountable than it did a month ago. The weather had been extraordinarily kind in general, making the outdoor work and times with parts of the house unprotected from the elements much easier to deal with. As I mused in email to a friend, it wasn't a roadtrip but definitely a different kind of adventure. A weird mix of elegant solutions, armchair research, and arduous cruft-busting, but all well worthwhile. And possibly worth one or two others' whiles in addition, as I continued trying to send my excess stuff to happy new homes. And I was by no means done doing that yet.


[Click any image for a larger version.]

    A storm of windows

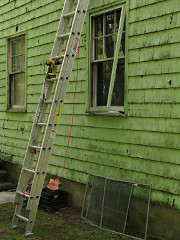
Removing storm windows Genuinely warmer weather had arrived, to the point that I didn't need the extra insulation-value of the storm windows any more. The contractors had implied that their method of removing the storms from the house would likely destroy them. While they get credit for probably having a fast and efficient method, I wanted to see if I could pull them more carefully myself in advance and preserve them as usable windows to send off to another home. This wasn't hard, only slightly tedious in that all the screws holding the flanges needed the paint chipped out of the heads before being turnable. Some were slightly mangled but a screw-gun with a good bit and some pressure behind it can accomplish some amazing things. The triple-track panes got removed from the inside and once all the fasteners were out, the empty frames cracked easily away from the exterior trim and were trivial to carry down the ladder.


Organized storm windows Each window and its parts got assigned and labeled with a unique number, sorted into sets on the back lawn. This would make it easier for a recipient to match up a batch of pieces, as for a given window size they might not be *exactly* identical unit to unit. The windows were probably custom-ordered in the first place, especially given how precisely their flanges seemed to fit into the exterior trim, so it seemed best not to get them mixed up.

Old caulk, still liquid! Most of the storms had some caulking around the flanges, and in one of them it appeared to have never actually cured over the years and clung to the parts in gooey threads as I tried to pull away some old tape that had been stuck in under one of the frames. I think caulk just does this sometimes -- in my own adventures with it I also had one small area of basement-window-blockoff insulation whose caulk bead seemed to stay liquid for *days* until I finally gave up and buried it under the final cover. Must be something about bead volume to surface-area ratio that doesn't let enough air get to it.
One interesting discovery about the storm-window removal job was a predominance of *aluminum* wood screws holding the frames on the house. Many of these were recoverable, just with a bit of green paint left on the heads, and found a home in a parts-bin drawer upstairs. They came in handy soon afterward: a little later I added a flashing strip to the other reworked basement window to stay as a window, where the bent-out strip simply attached right onto the existing sash frame over a bead of caulk, and in so doing I realized that the shorter aluminum screws were totally the right thing to secure that and to avoid future dissimilar-metal issues.

    Source and sink

I posted a complete list of the windows with dimensions to Craigslist's "free stuff" area, and ultimately found homes for most of them -- real homes, e.g. not just letting scrappers haul them off and break them apart to get a few paltry bucks from recycling the aluminum. When you get responses of the form "I'll take all of what you're offering" in a seemingly indiscriminate fashion, that's generally what the taker is intending to do. Not that it's necessarily bad that some people are making a little money on the side by hauling stuff to recycling centers, it just wasn't my ideal intent in this case.

Still, Craigslist was a great resource for turning my trash into someone else's treasure. Efforts to get stuff in general *out* of the house had leveled off a bit by now, but there was still more work to do. There always is.


Heavy recycle bin Why, for example, was I keeping Boston yellow-pages from 2001?? As I found more batches of old paper I really didn't need, it tended to pack very densely into the recycle bin. After watching the guy with the recycling truck go to lift this when full of glossy trade rags and having the weight obviously be a surprise, I had taken to dropping little warning notes on the particularly dense loads as I generated them. I think the collectors appreciated it; I was outside one of the days they came by and got a cheery wave before he huffed the contents into the hopper. Those fellas must have monster shoulders, as they do that all day long.

Departing furnace bits One of my storm-window recipients also does HVAC for a living, and upon spotting the discarded furnace bits said "want!" ... while I can't imagine what the old firebox and burner housings and mangled ductwork would possibly be good for, I wasn't going to argue the point because him taking it meant the HVAC installers wouldn't have to dispose of the stuff. The rusty hack lawn-art got dismantled and the guy loaded close to everything, sheet metal and all, and happily tooled off to his place on the Cape with it.

In retrospect, for all I know he might have just been another scrapper but he seemed reasonably sincere about his intentions when we were talking in the backyard. Whatever, I was past really caring about it.


Pulling old insulation Another thing I wouldn't be needing anymore was attic-floor insulation, given the intent to move the envelope to the roofline. The old batts were some disgusting brown layered crinkly crepe-paper stuff called Kimsul, high state of the art back in 1948 or so, and evidently treated with borate salts or the like because despite looking and feeling like tinder it wouldn't sustain combustion. It also seemed fairly mold-resistant itself but was likely harboring its share of mold underneath, as well as trapping unwanted moisture.

I punched some screws through a scrap of wood and attached a long handle to form sort of a little sharp-pointed rake, to facilitate reaching way down into each rafter bay to try and pull the whole batt up and out. This worked fairly well, but in general it was quite the sweaty, dusty confined-space job. I needed to get this done before the gable vents got covered over, so I could still run the box-fan mounted at one end and draw air through the whole attic to pull out the drifting dust.


Garbage bag stuck in attic hatch I worked this in a couple of different sessions, ultimately pulling eight huge contractor-bags of the stuff out of there. They barely fit down through the attic hatch, and needed quite a bit of gentle persuasion to squish down without ripping against the edges. It was kind of like helping my attic take a giant, fibrous poop.

Having the furring and drywall all exposed up above not only removes a huge moisture reservoir, it also gives the possibility of opening up some of the second-floor ceiling to "cathedralize" parts of the attic, although it's not clear how useful that would actually be with all the joists still in the way. They're not especially decorative and can't be removed as they're effectively the collar ties for the whole roof structure.


    More power to him

As mentioned before, I wanted to try running the new HVAC stuff from a separately energy-metered subpanel to make it easy to collect energy stats for heating and cooling. The power company's meter on the outside of the house had been upgraded to a remote-read type a while back, so I called them trying to find out what they'd done with all the *old* meters. Some surplus house in NY had bought all of them, but their minimum order was sets of four which is how meters generally come boxed for bulk installation. A little research aided by a recommendation from Marc Rosenbaum turned up that good ol' analog, five-pointer clockwork-style electric meters are readily available elsewhere in quantity one, notably from Hialeah Meter down in the Florida town of the same name. For cheap money, too -- like all of sixteen bucks. I ordered one, and a matched socket to put it in. I found out as I went along that just about anyone else doing energy projects and wanting to monitor an electric feed bought from Hialeah too.
 
Testing new electric meter The meter arrived a couple of days later, and got hooked up to the "fire hazard" rig for some quick testing. Here I could connect either the full 240V or just a half of it vs. neutral to the resistive load, to see the disk spin at various rates and make sure it was doing the right thing when only passing current through one side. As we say here in New England, works pissah.


I understand a reasonable amount about electricity and electric hardware, and there's a great profusion of the latter available at the House of Orange down the road. While I could have muddled my own way through a panel upgrade it might have involved more low-quality offshore parts than I'd be comfortable with, I would probably miss a bunch of code requirements, and it would have taken me forever to figure out and obtain all the stuff I needed. It wasn't as simple as a panel and a handful of breakers; the entire feed from the outside needed to be upgraded and rerouted, and discussions with various electricians held that 200 amps is pretty much the standard service now. I couldn't see myself pulling anywhere near that much, but if one considers an electric stove/oven, dryer, water heater, heat pump, plus all the random lights and plug loads running at once it could probably add up to well over 100A. And who knows, if I or a future owner got a crazy idea to put in a hot tub out back or something... anyway, it would be far easier to pay someone who routinely handles these jobs to come in and do it to my specs. The design I had in mind was pretty clear at this point, and even if electrics was a small part of the overall picture it had to be right.

However, I had no idea electrician-shopping would be such a nightmare.

In January I'd talked to a friend from the convention circuit who's an electrician by trade and seemed enthusiastic about tackling my project, saying he did service-entrance and panel upgrades all the time, and then went radio-silent when I tried to follow up and get him in for a site visit. I gave him plenty of chances.

The Daikin dealer recommended an electrician he worked with frequently, who was a little hard to reach [teachable moment: professionals should not rely on their teenage daughters to take messages] but he eventually came out for a visit and seemed to understand what I wanted to do and why. Made several promises to hook up with the local inspector and find out about any specific issues. But then he apparently just disappeared -- stopped answering email, never contacted inspectors, never made any moves to schedule work for me. Evidently he left the HVAC guy in the lurch too. After about three weeks of futile "so when do we start?" sort of chasing around, I gave up and started looking around again.

Glancing back at some accumulated homeowner-mailing-list traffic turned up a couple of suggestions, and long story a bit shorter I found one who could handle my slightly unusual little job. He was a little skeptical about the metered HVAC side but for the most part understood what I wanted, and suggested handling that part of the job on a time-and-materials basis and obtaining the meter itself would be my problem. But in the meantime we drew up a contract for the base panel and service installation. To finalize the arrangement I went, check in hand, to visit his home-office and sat around with him and his environmental-activist wife and a nice conversation about electrical work, CFL bulbs, sailboats, farmers' markets, hybrid cars, and whatever else. Bottom line, aside from the oil-tank removal guys, real live contractors were *finally* going to start hitting the ground for real here and we had even set a firm start date.

He was also a little skeptical about the basement-window blockoff panels which I was insisting be used as service pass-through points, but once I described their construction and showed him a little diagram he agreed that they were a wholly adequate way to avoid interfering with the insulation job.


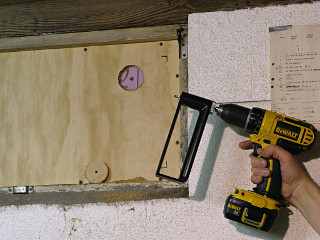
Hole cutting I mentioned this to his guys on their first site visit, and on their way out they left me a 2" PVC pipe fitting so I could determine the exact size of the hole needed for the *outside* diameter of their conduit. Turns out that the grey pipe rated for electrical usage is exactly the same dimensions as the white pipe I already had, so plenty of references were at hand. Pipe is generally sized by inside diameter, so my hole had to be about 2-3/8" to fit the outside. With work about to begin, it was time to get off my butt and go make said hole.

Anticipating the need for making a number of largish openings through the block-offs, I had picked up one of these at the Despot down the road. It's nominally designed for sheet metal but works quite well to just reach through the 3/8" PVC or interior wood layers and cut out circles without ripping into the XPS. Here the tool is missing its pivot piece because with my hole placed so close to the corner of the marked "safe area", obstacles on both sides of the wall presented the same problem but at different points -- after cutting most of the way around there wasn't quite room to swing the back end of the cutter handle full-circle and I had to more or less hand-guide the bit through each small last section.


Hole through sandwich I got nice round cutouts regardless, and then poked through and hand-carved out the XPS in between with a hacksaw blade to nicely match the edges.

I was glad to have tackled this early on, because a notable air space between the PVC and first foam piece needed to be sealed. This simply stems from the old window frame being slightly deeper than one inch at this layer so the PVC doesn't sit right against the foam. It isn't a problem on an intact XPS panel because it's air-sealed all the way around at its own edge, but a hole through it opens another potential leak from behind the PVC and around the penetration. A ring of low-expansion spray-foam squirted in around the hole and then trimmed back after curing is thus a necessary part of making a pass-through. Think of it as a little mustard in the sandwich, or something.

An interesting subtlety is that the cured spray-foam should be trimmed so that it actually protrudes into the hole just slightly, and then *pressed* outward to the right radius. This lets it stay in elastic contact with the pipe as it goes through improve the overall seal, and may require slight chamfering on the leading edge of the pipe before being carefully inserted through the sandwich.

This may seem like over-the-top weenieing about small details, but stuff like this is important to maintain insulation integrity. It's also a good example, in the realm of considering the whole house as an integrated system, of when "the trades" need to talk to each other and coordinate efforts and order of operations. In this case I'm the insulation trade, and anyone who needs to make a wall penetration needs to conform to my design spec in the process or the building envelope gets compromised. I've seen some incredibly sloppy wall-penetrations while examining various electric and HVAC and plumbing installations, and even if a little token Great Stuff is squirted in it's often without much thought about the thermal profile or air-leakage paths of the whole assembly. All the building-science wonks agree that one *cannot* be cavalier about that and ignore the necessary detailing to make it right.

Trying to convince most mainstream contractors about this, who would rather take a hole saw and bang big holes through everything willy-nilly, is another story.


Electrician tools and supplies The electricians arrived bright and early the next morning, and loaded in all their gear and the parts they'd need for my rework. They eyeballed my pass-through hole, test-fit the end of their pipe and declared it perfect. For the record, 2-3/8" OD for two-inch grey electrical-grade PVC.

Cutting backboard to size The old mounting board was way too small for everything they needed to attach, so they brought a sheet of plywood to scab onto it. To clear the plumbing it had to be cut down a little -- they expected that.

Their battery-powered saw *almost* made it through the cut, but I had to hand my old skilsaw and an extension cord out the door so they could finish it.


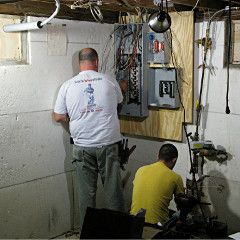
Milk crate for extra height Serious rip-n-tear commenced on the old panel, and soon the wiring guy was buried in a hanging mess of tendrils like in those old horror movies where the vines move and dangle down and ensnare a victim. I was amused to see him using the same milk crate I often stand on to access things near the ceiling. In response to my comment, he said something like "yeah, I spend a lot of time on milk crates..."

Service entrance conduit run in Meanwhile, before I could even try to oversee the process, the other guy had already run a piece of pipe in through the hole and had a ring of PVC cement between it and my panel curing up outside. Eep! I'm sure he wasn't quite as careful on the insertion as I might have been and he didn't bevel the pipe end before shoving it through, but nothing seemed to get mangled and he was confident that everything would wind up well-sealed.

Service entrance conduit exterior However, his pipe was so long that it overbalanced the slight downhill-toward-outdoors slope I was trying to maintain. To bias it at the right angle he weighted the outer end a little while the cement cured, and I went and stuffed a small shim underneath on the inside to help hold it there. Later I would caulk the inner side appropriately but there was a lot of wiggling around that needed to happen first.

At this point he had also pulled the meter, taking the house dark. I was ready for that, of course -- already had my coffee, brought the mail server down, and had the UPSes running to provide work light in the basement so they didn't have to clip onto the still-live side of the meter socket. Here we also see the two long copper-coated grounding rods that are now a code-required part of a service rework.


Old cruft inside meter box I expected the inside of the old meter box to be more decrepit than this -- it had its share of spiderwebs and a bit of rust at the bottom, but the NEMA 3R style enclosure and the blob of ancient putty around the top wire inlet seemed to still be keeping bulk water out.

Strange temporary service-entrance rig The pipe was left long because of all the future uncertainties. None of us were sure exactly how far out the insulation and new siding would sit, or how the feeder would head over to the panel inside. So they left it "temped in" with a long piece of somewhat undersized "SE cable", the typical aluminum-conductor stuff commonly used for Service Entrances these days, and enough slack to float the meter reasonably far away from the wall whenever the time came.

Electricians working With the new panels happily mounted in place, the rest of the inside work was pretty much plug-n-chug to run all the old circuits [which I'd labeled under my old numbering system] inside and hook them up. Most of the old wires were long enough to reach on their own; there were maybe three short ones that wound up going to a small box up near the sill and then extended with new Romex to reach.

A slightly different temporary ground attachment was done to the water line, and last thing was to wire a 60A branch over through the meter and into the subpanel underneath.

The work lights I had supplied were running on my UPSes for a few hours, one of which was doing the typical APC periodic "beep-beep-beep-beep" alarm thing the entire time. I offered to move over to a different backup unit that didn't do that and turn the noisy one off, but the wire guy was like "nah, I don't mind, it's helping me keep my rhythm!" and later I heard him sort of singing along with it while banging his way through the branch circuits. I was amused. The UPSes held up the whole time without switching sources, which was convenient.

Pounding in ground rods In preparation for the final code-compliant new service entrance, the big ground rods were driven in. I was astounded that our hard-working hammer wielder here was able to pound their eight-foot length down fairly far without hitting a zillion rocks -- this *is* New England, after all, and we have lots of rocks. But the soil off this side of the house appears to be fairly soft and homogenous. It's got good drainage -- I'm certainly not complaining, and the moist sandy soil probably provides good conduction too.

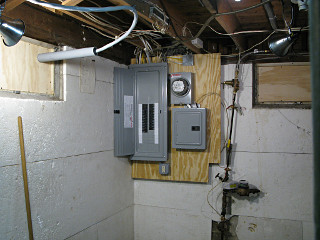
Open panels, nice wiring job The wireman did a really nice clean job, considering what he had to work with. They couldn't use the snug little meter socket I had bought along with the meter as there wasn't enough working room inside, so they supplied a bigger one.

New panel rig The new setup occupies a bit more wall area than the old rig, but there's plenty of room in the corner for it all without impinging on the plumbing. Newer code calls for lots of bending space around the connection areas inside boxes, which is why they're generally larger than the older types for a given number of branch slots.

Now I wouldn't be able to tell people about having an old 60A fusebox and get to watch them cringe.

Interestingly, the GFI convenience outlet they installed below the subpanel failed about a month afterward, got a brief autopsy here, and then get sent off to the manufacturer for analysis. Leviton eventually sent a replacement [which I didn't care about] but never offered the feedback I asked for on the failure.


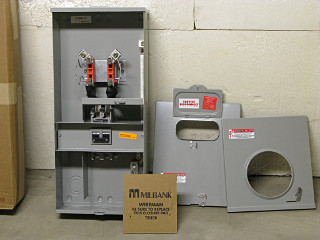
Outdoor meter box, maybe They left this monster here, with the intent of eventually mounting it on the outside wall as the official, final meter socket and service entrance. It's another type of NEMA 3R enclosure, which by design and spec isn't 100% weather-tight or insect-tight but can shed and withstand typical falling rain and ice without letting water into internal components. I was a little bothered by the idea of having the main disconnect outside, where someone could conceivably walk up and mess with it, but fortunately these boxes are lockable. This sort of thing is quite standard now, even for a small residential installation. Code wants the main service disconnect as close as possible to the meter, to avoid having long runs of unprotected cable.
I hadn't heard of Milbank before, but after looking closely at this and some other gear they make, I'm impressed with their fit and finish by contrast with what else I've seen. Most off-the-shelf electrical hardware is rather klunky and rough, with sharp non-deburred metal edges, cheap plastic standoffs and channels, knockouts that come half knocked-out already, and closures that take a bit of fiddling to close. This feels like generally higher quality. Milbank is supposedly the largest industry maker of meter sockets and associated gear these days, and after learning of their existence I started noticing their stuff attached to the sides of buildings all over the place. Funny how that works.

HVAC circuits run A few days later the electricians came back to start running the circuits for the new HVAC stuff. Two runs for the inside air-handler, and two runs to the outside -- a 15 and a 20 apiece. I had to give them the circuiting info, since the HVAC guy didn't bother coordinating with them; it was easy enough to print out a couple of pages from the installation manual (pdf) containing the table showing voltages and "Maximum Overcurrent Protection", e.g. what rating of breaker to put in. Their guy did a nice neat job putting them along the running-board I had mounted to get across all the joist bays. He said the plywood was "perfect" as far as a surface to attach it all to, and the result was exactly as I'd envisioned it when tacking that board up in the first place.

Next section   (05)
Index

_H*   120528