
Sorry, a squirt of 20-year goop is not a proper fix for a 50+ year roof.
|
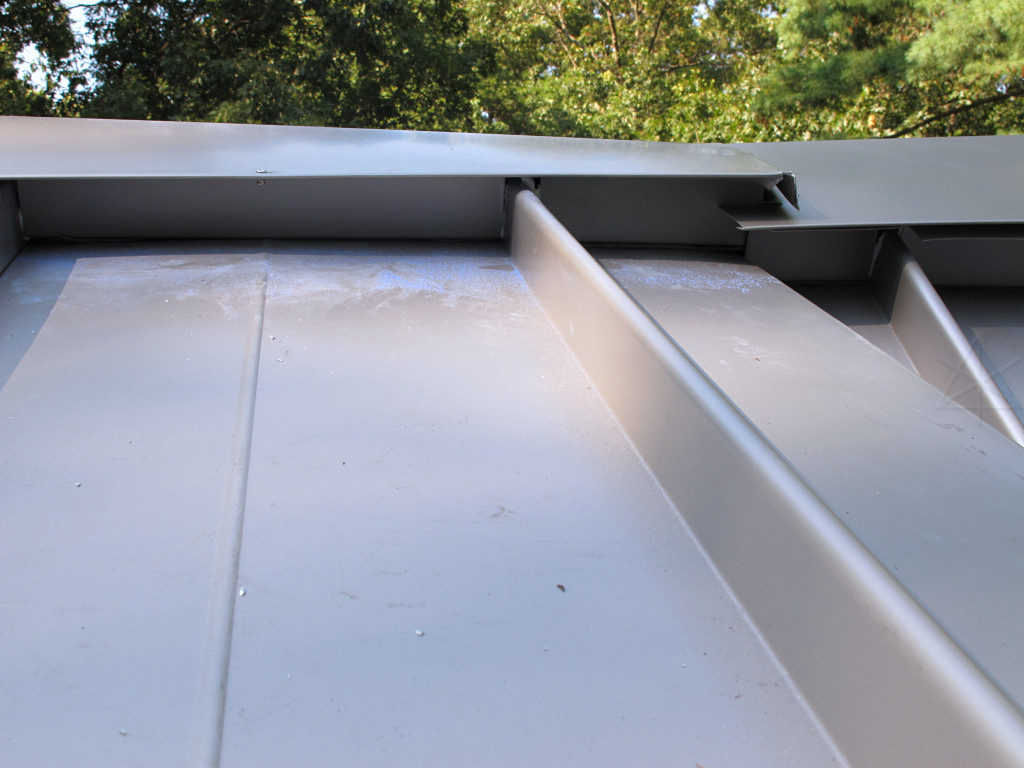
One thing the roofer omitted doing on my metal roof was to join the sections
of ridge cap properly. The ridge cap is vitally important because it
straddles the necessarily open area where the top ends of the panels are
anchored, and in conjunction with the Z-closure insert pieces alongside
keeps water from getting up into that area even if blown sideways.
The cap has fairly generous dimensions to either side of the ridge
to make sure it can sit over all that stuff, but it isn't as long
as the entire ridgeline and therefore must go on in sections with
as many joints as necessary along the way. The joints, obviously,
also need to be reliably watertight under all possible conditions.
In reviewing some of the instructions for one or another standing-seam roofing system I came across a section about ridge caps, where a couple of alternatives on joining sections were presented. One suggested an overlap of at least six inches, and another endorsed use of additional ridge cap SPLICES which hadn't even occurred to me before but I immediately understood what they'd look like. In remembering what I'd seen up on my roof, I knew that my roofer had definitely done those joints wrong. |
|
|
I went topside for another look. Of the two joints along the run one had
less than two inches of overlap, and this one had hardly any. The last day
the roofer had been here he slopped some caulk along the gap of this one and
called it a day, which clearly was insufficient as it had already detached
and was leaving an open gap that rain could blow into. This might as well
have been a butt-joint for all the good it was doing now. He even tried to
caulk over a failed pop-rivet insertion and just left the wreckage
sticking up.
Sorry, a squirt of 20-year goop is not a proper fix for a 50+ year roof. |

|
Water wasn't the only issue, as there was already a tiny little wasp nest
hanging in the space underneath. Fortunately, unoccupied at the time.
But I knew wasps were rather drawn to this roof in general -- they love
hot metal structures in the sun, and any time I was up here in a warm
daytime there were a few of them hanging around poking into the various
small holes I hadn't already stuffed fiberglass into. Some evidently
decided to set up camp.
This isn't a problem unique to metal roofs, of course, as stinging insects of all stripes have almost as much affinity for nice chewy wood structures with heat-collecting shingles slapped on top. There were always several little nests like this in my old gable vents, too. |
|
So I needed to make some splice pieces, which would basically be slightly
oversize copies of the ridge cap to pop over the joints and extend out
along the ridge some generous distance beyond. But from what material?
I had plenty of crappy sheet aluminum kicking around, all of either some
different color or bare metal, and wondered if there was any way to make
this look Not Ugly. I didn't have enough cutoffs of the original panels
left to cut anything sufficient from. Nothing even vaguely resembling
cap splice pieces had come with our original kit when the roofing was
shipped, so I called up the supplier to ask if they had any such thing
or what my options might be.
Since I pretty much expected to be fabbing the required pieces, they referred me to their metal shop and a guy there poked around and discovered that they actually had a piece of the same Silversmith metal, just plain sheet, in a 1 foot by 10 foot roll. That would nicely make three or four of the requisite pieces so I offered to take the whole chunk off their hands if that was best for them. Then I'd also have some material left for any other little fixups needed later. They came up with a price and we agreed that they'd pop it onto a truck for their outlet closest to me for me to pick up, and there was no hurry on any of it. Another couple of weeks went by and nobody called, so I poked the metal shop again and it turned out they'd never sent the piece up. They then did so, and somehow in the process they'd also decided to just give it to me gratis instead of accepting the originally agreed on token $15 or whatever it was. They didn't have to do that, I said, I was happy to pay for the piece but apparently I was doing them sort of a favor by taking what was essentially scrap off their hands so I went with it. In thinking about how the caps should work I decided that a simple bend of metal over the junction wasn't quite good enough as wind-driven water could still migrate underneath. No, remembering the miserable hell and sketchy patch job that the Grace under there had gone through I wanted some actual sealant material involved, to divert *any* errant water away from the ridgeline area. I thought that not only could the original joint itself get sealed up better, judiciously located strips of closed-cell foam might be just the thing to stop water before it got that far in. But that would need a little room underneath and I wanted the splice edges to be pretty tight. Bottom line, the splice would want to hump up ever so slightly in the middle over the original joint, fitting closely to the original ridge cap at its outer edges but leaving room a little ways in for the foam strip. I modeled this up with a bit of cardboard and determined the extra shaping it would need. |

|
Each side of the piece would need a small crimp, like a gusset, to
encourage the piece to bend a little differently. It didn't need to be
beautiful or exact, just enough to shorten the two side edges a little.
I didn't have a nice bending brake on site anymore, and this .032 aluminum
is fairly sturdy stuff, so it would take a bit of tooling and force
nonetheless. While cutting the base pieces and poking through some
scrap I refined how this would work.
To do this in a uniform fashion, I threw together a long skinny wedge assembly out of wood shim pieces as a mandrel. |

|
The wedge got taped under each side of the piece in turn, and a couple of good hard heel drops onto 2x4s at either side forced the metal down over it to the floor and left a small hump behind. Redneck as heck, but it worked. |

|
So now I had the two cap pieces pre-humped and ready to fit to their respective locations. The dimension along the ridgeline had to be the short 12" side of the stock piece, as I needed more like 18 inches to go over both sides of the whole original cap with some to spare. So I'd in effect get my six inch overlap past the joint, but just barely. |

|

|
|
First thing was to prepare the original joints. We were just into prime
pollen season as evidenced by all the green dust down the panels, so a
good surface cleaning was step one. The pop-rivet remains came
out and that hole got patched, and then a strip of Wigluv was the perfect
thing to seal over the open top part of the joint because it's *so* sticky
and yet very flexible. It's also supposedly UV-stable but once my splice
piece went on top, that would be irrelevant. Alongside that my foam
weatherstrips got stuck onto the original cap, sealing against the lower
surface so incoming water would have to stop there and run downward. Each
splice piece needed a little custom slitting to accomodate the standing-seam
ribs nearby, and the bends that would go around the original ridge cap
were started at the right spots. Starting rivet holes got drilled in
the splices, but I'd leave drilling the rest until the piece was pressed
down into the right place in realtime.
Since the little gusset crimps would leave small holes up into the splice piece, the last step was to secure a couple of fiberglass wads right under where my little buzzing buddies would invariably try to come in. Who knows, if they got under there they might chew holes in the tape. But really, I considered the tape and the foam-strips and all to be extra insurance that might crumble to dust long before the aluminum is ready to call it quits -- the point was really to get correctly formed splices on that would always be the primary barrier to water entry and keep it far enough away from any vulnerable places. | |

|
From there it was a fairly simple matter to position the splice piece and
mash it down, drill the rest of the rivet hole [carefully, to avoid having
the bit slam through and puncture the panel underneath!], and install
rivets in such a way that the piece was pulled fairly tightly down over
the foam strips. Done. One rivet per corner seemed like enough, no
need to go nuts especially as all this would have to move a little
and accomodate expansion.
The rivets were obviously sent through the original cap and Z-bar on the downhill side at the same level as the cap fastening, or it would have defeated the whole purpose. It's amazing how many people working with this stuff don't always think about where their panel penetrations land. |

|
In addition, the free edges got folded under enough to help hold the
splice down if the rivets ever came loose, and give our li'l friends
fewer places to hide.
The splices are almost completely invisible from the ground. |
A delayed ending
| I had also never been quite happy with how the roofer interfaced the two small cap pieces at the ends of the ridge over the dormer split, leaving me with a sort of redneck pseudo-flash that I wasn't convinced would really reliably shed water in the right directions. He had tried to re-bend things a little better during his final visit, but it was still fairly open and wind-driven sideways rain would likely find its way in under the main cap regardless. I wanted to get some kind of cover over that joint too, just enough to get water at the very top headed the right way, but the slopes and shapes of the existing relevant parts meant that adding an extra cap here wouldn't really do the trick. |

|
I didn't do anything about this until a year after the center-section caps,
but one beautiful May morning it suddenly struck me that there might be
an easy quick-n-dirty fix for the ends. I still had a small roll of
Wigluv left, which would be wide enough to bridge across those
sketchy not-really-flashed joints.
I re-checked some references, confirming that the tape is "UV stable",
and decided that even if it wouldn't last as long as a piece of
metal it was worth getting *something* onto those joints to keep
horizontal rain out.
To make the proposed hack-job a little less visible I cut the strips and then gave them a quick shot of silver spray paint and let them dry before installing, which also allowed making sure that the paint solvent wouldn't simply destroy the tape substrate. It seemed to hold up okay, and the skin of paint even stayed fairly flexible. Perhaps this would even afford a little better UV protection. |

|
This fix got applied at both ends of the roof, which while hokey was still better-sealed than the clumsy shot of caulk the roofer had given them originally. Maybe I'd have to replace these every once in a while, but it would provide a little more peace of mind in the meantime and perhaps I would find a better long-term solution later on. After I posted about it over at GBA, some folks recommended other products possibly more suited to this sort of completely exposed application. |