[Thumbnail images link to larger versions.]

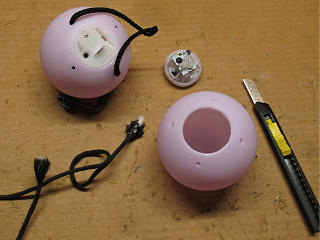
Here I've got the second pair of holes drilled in one ball and the other one marked up, and some different cord ready to become 4-way bridles.
|
Okay, so I've been getting into one small sector of the flow-arts spectrum
lately -- staff spinning, which so far is the only form that seems
to have any real appeal for me. Local folks who know me understand
that my true flow art [besides Prius-driving!] is loading trucks and
playing Tetris with heavy objects, but that's not something we generally
do for idle amusement at social gatherings.
With the rapidly rising popularity of flow and circus arts around the
community, often with fire involved, it seemed appropriate to find
something related to play with.
While poi always seemed a little too wildly uncontrolled and I never really
got the hang of juggling or devil-stick or hooping, there's something
about the dynamics of spinning a stick that's always intrigued me.
So I found a random piece of PVC pipe kicking around the house and started messing with it to analyze how some of the moves work, and pulled down a few of the *thousands* of videos out there on the subject to watch and single-frame through parts of for guidance. From martial arts bo-staff kata to marching band drum-major and baton-twirling to general "manipulation", there was clearly a lot of common ground in the basics. I even took notes, building a to-do list of stuff to try working on. As understanding grew so did a certain enjoyment -- it seemed to feel comfortable and flow nicely for me, and the fairly light piece of PVC didn't hurt too much when I would inevitably whack myself with it. After a while I still felt nowhere near ready to set fire to anything, but wanted *something* to add a little luminance to the play. Various light-up staff products from the likes of FlowToys seemed inordinately overpriced; I just wanted to bang something together on the cheap. Perhaps an easier route would be to adapt a set of inexpensive LED poi balls and come up with a way to mount them, and in fact the addition of two-inch-ish embellishments to the ends would make my slightly-too-short practice staff closer to the right length for me. Amazon offered several choices, so I ordered a couple of different sets to see if one type might be more or less easily adaptable for the purpose. The first pair soon arrived, amusingly from Magic Matt's Blinkies, and I got to work. |
Nope...
|
However, this approach was doomed. I took it outside for a quick
spin, and after a couple of drops and leg-whacks things felt much looser
and the electronics module had already sort of capsized into the ball
somewhat. The strings pulling the edges of the flexible hole
all together like that were only distorting everything and not really
holding the ball tight to the stick. I needed some different
approach, and plan B was to try attaching from the other side
of the ball.
After deciding that machine ringbolts and craziness with wide washers and locknuts was just overkill, I popped by the hardware store for some self-threading ring screws whose eyes were just small enough to fit down inside the 1/2" PVC. |
|
But again, failure. One of the little wood blocks split apart
fairly soon, and the other one was clearly getting stripped with the
strong forces at work on it. The attachment pull into the end of the
pipe had to be fairly large to hold things steady, and once dynamic
stresses from side impacts were added, squishiness or no, the wood was
simply not adequate to hold the ringbolt.
Nonetheless, I could already see that the general mounting methodology was sound and refinement was just a question of using the right materials. |
Rev two
| A couple of days later the second set of balls showed up, this time from SpinballS. These turned out to be an almost identical design, possibly with slightly better build quality and a different-ish set of blink/fade patterns. Having found a workable mounting method, I figured it would do okay for this set as well and I had plenty more PVC slab and ringbolts left. But I wanted to try and avoid coring the entire electronics module out of the bottom, preferring to leave it glued in if possible. |
|
Having two different makes of poi-balls allows a larger range of patterns
in the LED timing, especially with mixed brands A and B at either end of
the staff. One downside might be that the electronics and battery
case out at the end might be a little more vulnerable to drops, but the
power/selection buttons are recessed and the battery lids screw down
pretty securely.
The entire module can squish inward away from incident impacts anyway, so
there's actually very little potential for damage. Even the
twistied-in modules on the first set have stayed put even though they're
pretty much floating where the glue used to be.
Mounting the balls definitely changes the spinning dynamics of the staff, adding rotational inertia *and* air resistance, but I've found that the slower time-constant of everything allows exploring some different aspects of the art. The PVC pipe is still too light and slippery to mess around much with contact play, but there's plenty to work on just in the area of regular hand spinning. And the balls could still be used as poi, but I figured to eventually give the spare leashes away to more suitable enthusiasts. The other big advantage of single staff is that you can generally get time to swat mosquitoes with your free hand, and not miss a beat. Try that with poi! |
The next phase
| So all this was fine and dandy, but on further researching the field of of glow props I began to envision an evolutionary path all of this might be able to take. I wasn't necessarily about to spring for any high-dollar stuff like the Concentrate line or the very spiffy image staff from Apixeltoys, but having a bit more sweep area lit up than just balls on the ends seemed like a fine thing to pursue. Clearly, so to speak, one base material would have to be some transparent tubing to build into. Longish shopping-trip story short, Amazon is a great source for so many things, including sturdy polycarbonate tubing and a wide variety of cheap blinkie-toys that can be torn down for their parts. The sporting-goods market has developed some very grippy types of soft-feel tape for wrapping around bat and racquet handles, also ideal for making center grips for this sort of thing. With relatively modest investment and a bit of engineering and assembly time, these things could readily come together and form an improved design. |

|
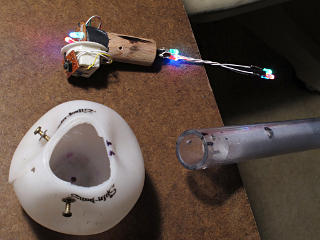
I was away from my home workshop at the time but had brought some parts and materials with me, and managed to make do with the rudimentary tools on-site where I was staying to put an early revision together. It totally looked like a homebuilt bomb. Two clusters of RGB LEDs to point down into the tube, now lined with some white foam and sort of an interesting glittery sheet of diffusion material, and one more cluster would light the ball on the end. Everything was fastened to a bit of 3/4" dowel, which fit perfectly inside the 1" OD polycarb tube and the ball and everything else simply got screwed together from three directions. A bit fiddly to fit up, but fairly solid once snugged together. The little black button-switch could be activated by simply pushing in on the squishy ball at the right spot over it [later sharpie-marked at each end of the staff]. |
|
For a total crock that I thought would be very fragile, it took its
share of whacks over the next couple of weeks and seemed to not only
survive but also impress quite a few people when in play.
To get an idea of the visual dynamics I shot a
short video
[1.3 Mb]
of the two or three simple patterns from the blinkie-driver.
The LED cluster spacing and spread turned out better than I expected,
and you could almost believe that it's a commercial product.
A subsequent modification of this, for the sake of robustness and a more practical energy source, could have a simple sprung holder for an 18650 lithium cell which fits quite nicely inside the tube with just enough room for small wiring to get past. Given that the three little button cells in the white box powered this rig for five or six evenings of healthy activity, a charged 18650 would probably last for *weeks* of frequent entertainment. * * * But that's not where the evolutionary path headed. See the next chapter for what happened next! | |