| Part 1: Overview; tires/brakes | |
| ==> | Part 2: Underhood |
| Part 3: Headlights: the Big Schnoz | |
| Part 4: Inverter pump | |
| Part 5: Coolant testing | |
| Part 5b: Engine coolant | |
| Part 6: Transaxle / driveline, references |
|
|
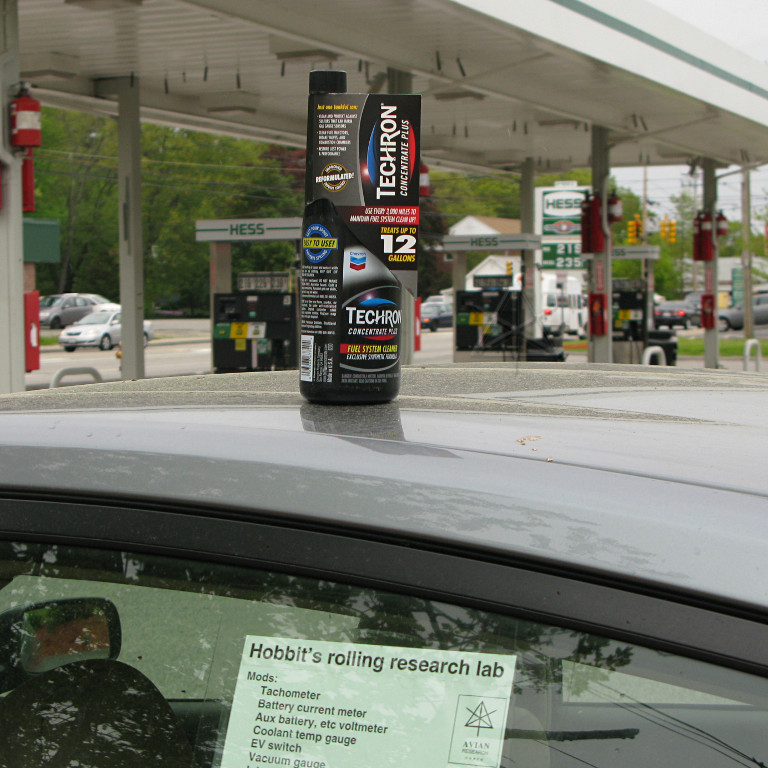
I have irregularly run a bottle of this stuff through the fuel system a few times via a tank of gas, in a somewhat blind-faith belief that it will help keep the injectors and other fuel-delivery parts cleaner. Several people swear by the stuff, or its roughly equivalent competition from SeaFoam or Gumout. There have been no directly noticeable driveability effects from using this, but it's relatively cheap insurance -- against exactly what, I'm not even sure anymore. According to this post that makes me a dumbass, but at least now I know the difference between polyether-amine (PEA) and naptha based cleaners vs. the others. It's even more ironic as I am not aware of *any* substantiated Prius forum reports of bad or dirty injectors genuinely requiring replacement [that wasn't some sort of bumbling misdiagnosis or shady service upsell, anyway], even in Priuses that have gone over a quarter-million miles. That's about the best testimony to how Toyota and Denso builds their injectors. By contrast, the old Subaru lost one at around 60,000 miles. |
|
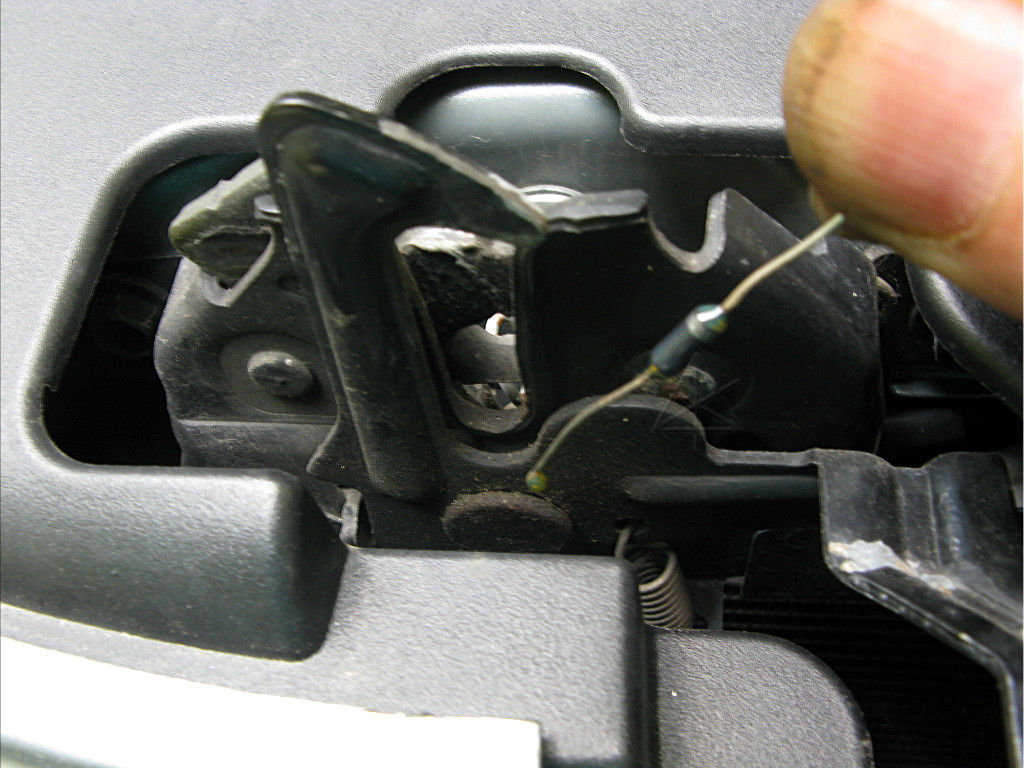
As long as we're fumbling around with the hood latch, might as well make sure it gets a little touch of lube to stay working smoothly -- on the pivots of both the main latch and the secondary one. I generally use 90-weight gear oil for this sort of thing, as it's just non-viscous enough to flow into moving parts but then stick around for a while. One bottle of 90-weight is pretty much a lifetime supply for these little jobs if you're not routinely refilling differentials and gearboxes with it. |
|
But back to fuel and induction systems.
The Scangauge is able to query the engine ECM and watch the short-term and long-term fuel trims, which are a measure of how far "off" the car thinks the supply of fuel needs to be to sustain stoichiometric burn. Injection-time feedback is derived in part from the air/fuel ratio sensor in the exhaust, biased by the fuel trims in some way according to a map in the ECM's memory. The trims are real-life offsets from the "perfect" numbers that would be based purely on throttle opening, airflow, temperatures, and RPM. This map constantly gets tweaked and re-learned as the car is driven and as sensor accuracy changes over time. One downside of disconnecting the 12V battery is that the keepalive for that fuel-map memory tends to get cleared, and takes a couple of days to fully re-learn the actual numbers to supplement the base factory numbers. My long-term fuel trim has always run slightly negative, anywhere from -1 to -3 which is a percentage, but more recently it seemed to have drifted even lower, reaching as low as -6 for a while. As I had just been to an event at a fairgrounds where there was a lot of dust in the air most of the weekend, this got me to thinking that maybe the air filter and/or the mass air-flow sensor might be dirty. A restrictive air filter would definitely let the car pull less air than it expected to have and thus have to knock down fuel flow a little to make up for that, and a fouled MAF can cause all kinds of random mixture variances depending on flow. |
|
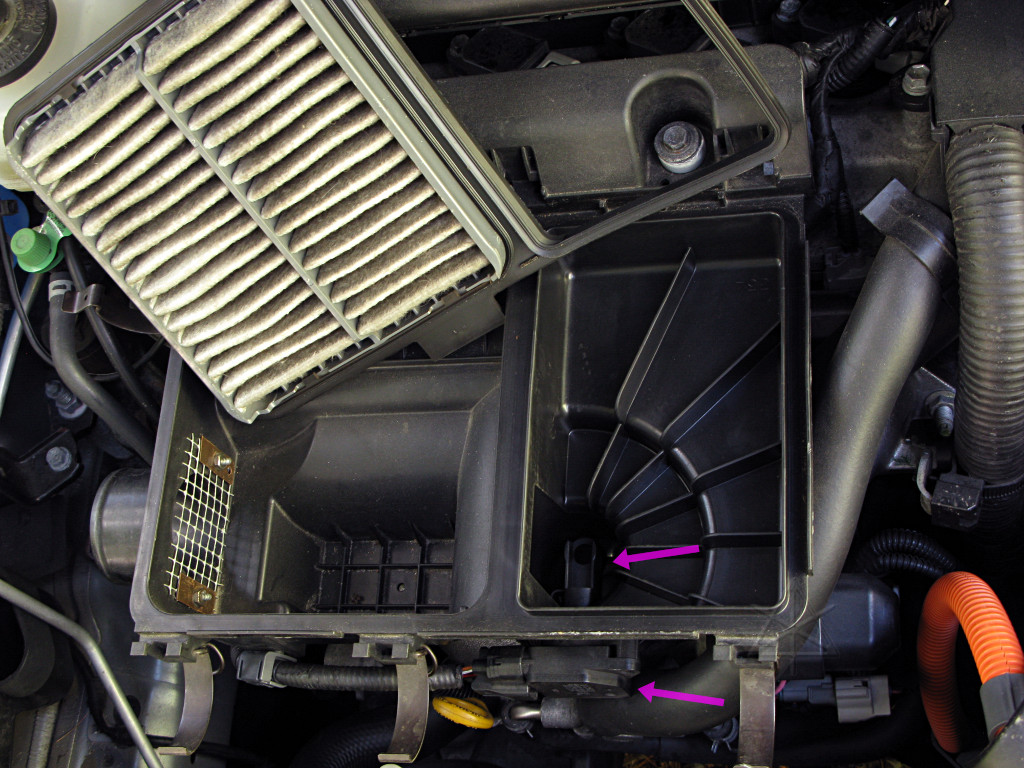
Popping the cover off the airbox and removing the filter is trivial, and
allows inspection to make sure the "clean side" is still clean. Here we
also see my "critter screen" over the intake hole to keep the rodents from
climbing into the airbox and having a big ol' acorn party in there. I have
had to do this in almost every car I've had in the last decade, as especially
in cold weather they love to crawl up in such places because they're warm
after the car comes home. They can find their way along some very long dark
intake snorkels, in fact. When they start munching on the fibers of the air
filter itself, which *has* happened in previous cars, that's where I draw
the line.
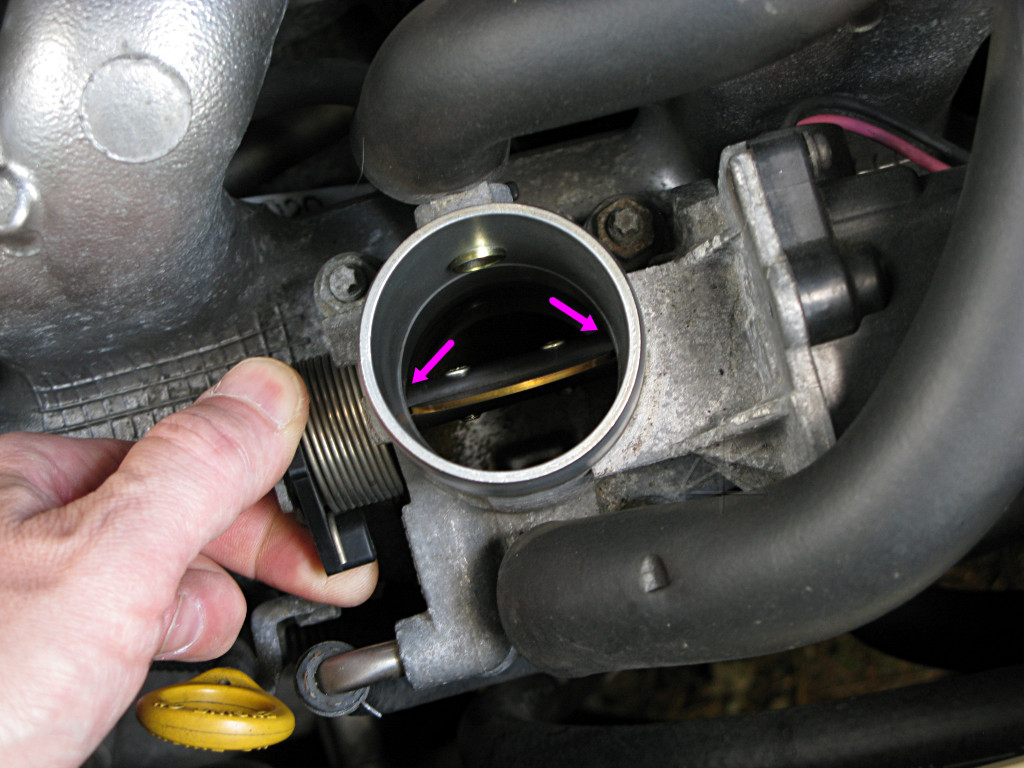
The MAF assembly [pink arrows] mounts through the front of the intake, and sticks into the stream sort of like the platform Luke fights Vader out onto in Episode V just before losing his right hand and learning the big revelation about his ancestry. That too was an air shaft with a significant downward flow! The sensor block could be removed right from here with a very short screwdriver, but it's easier to take the whole air-box off and have a look underneath anyway. |
|
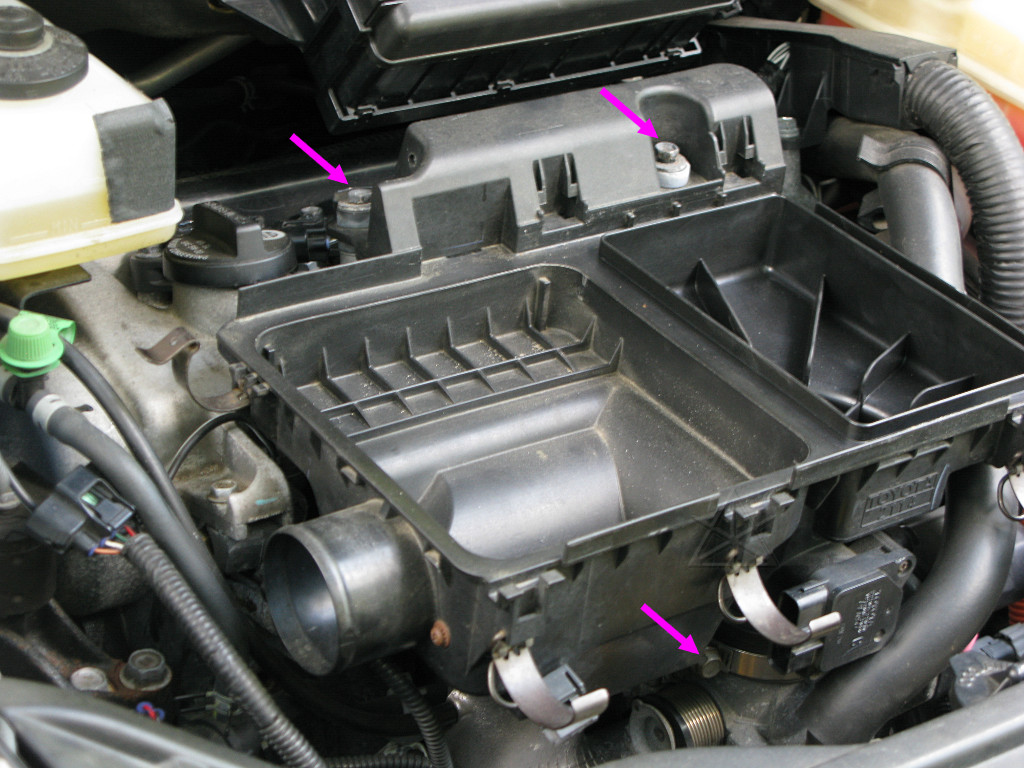
[This is greatly aided by taking off the plastic "radiator cover" first;
see part 3 for details if needed]
Removing the rest of the air-box is done by removing the top two bolts and loosening the lower one to relax the band clamp around the throttle body. The small harness to the MAF on the front has already been disconnected and pushed aside, at the left of the pic. The pre-filter intake snorkel has been off this car for most of the time I've had it, starting around the early heat-recovery ducting experiments. In general it just gets in the way. This engine generates almost no intake noise regardless, especially with the way I drive it, and the plastic ducting just winds up collecting dirt and blocking other things. There is no detectable MPG difference with or without it. |
|
The throttle shaft pivot points get a little touch of that same gear-oil every so often too, and the butterfly and throat receive as much of a wipedown as a rag around a finger can easily reach. A full throttle-body removal and cleaning generally isn't necessary; I've done that only once so far, and then only with it lifted far enough up to disassemble and lube the motor gearbox without actually having to disconnect the two coolant hoses. As long as the shaft and the connected motor turn relatively freely from full close to full open and there's no crud buildup on the edge of the throttle plate, there should be no sticking problems. Note that full close is beyond the dual-spring "rest position" just a little. There is more general info about the throttle body in the teardown document about it. |
| If our tiny one-handed Luke fell down this far, he'd bounce hard off the throttle plate and then splat into the shallow sump of oil that's always at the bottom of the "surge tank" ahead of the intake runners. Long experience from many owners shows the presence of a little oily stuff there to be completely normal and not just in the Prius, although its Atkinson-intake valve timing may tend to contribute more to fluid accumulation than in some other cars. With crankcase oil levels properly maintained, the puddle never gets deeper than a couple of millimeters anyway. | |
|
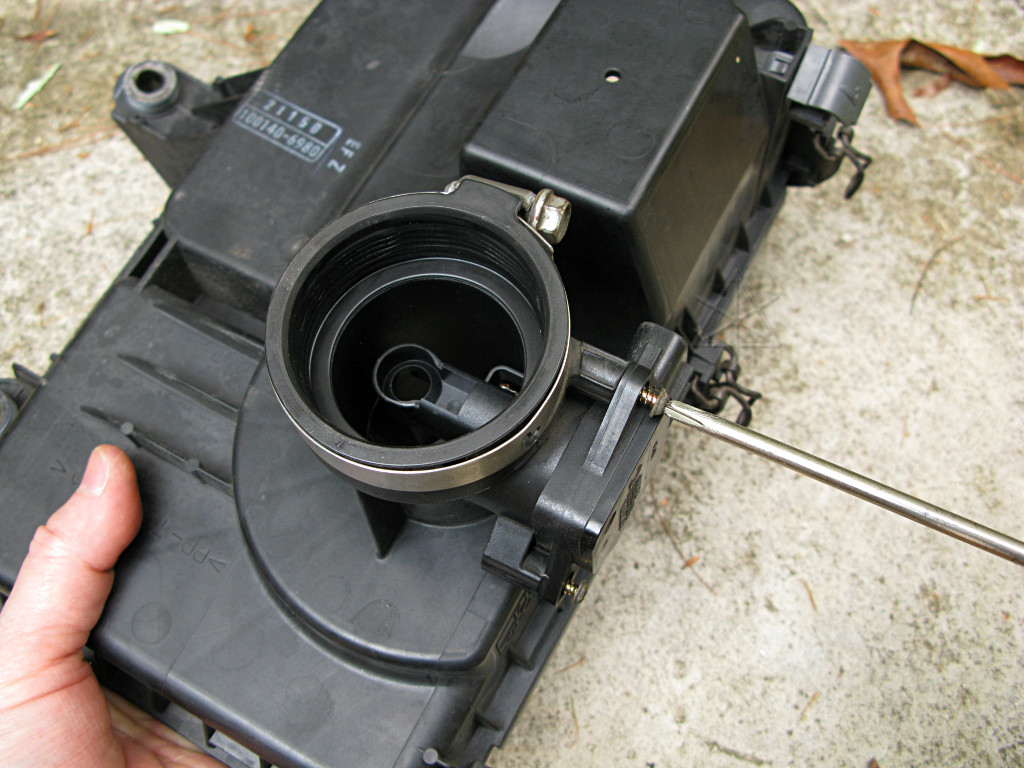
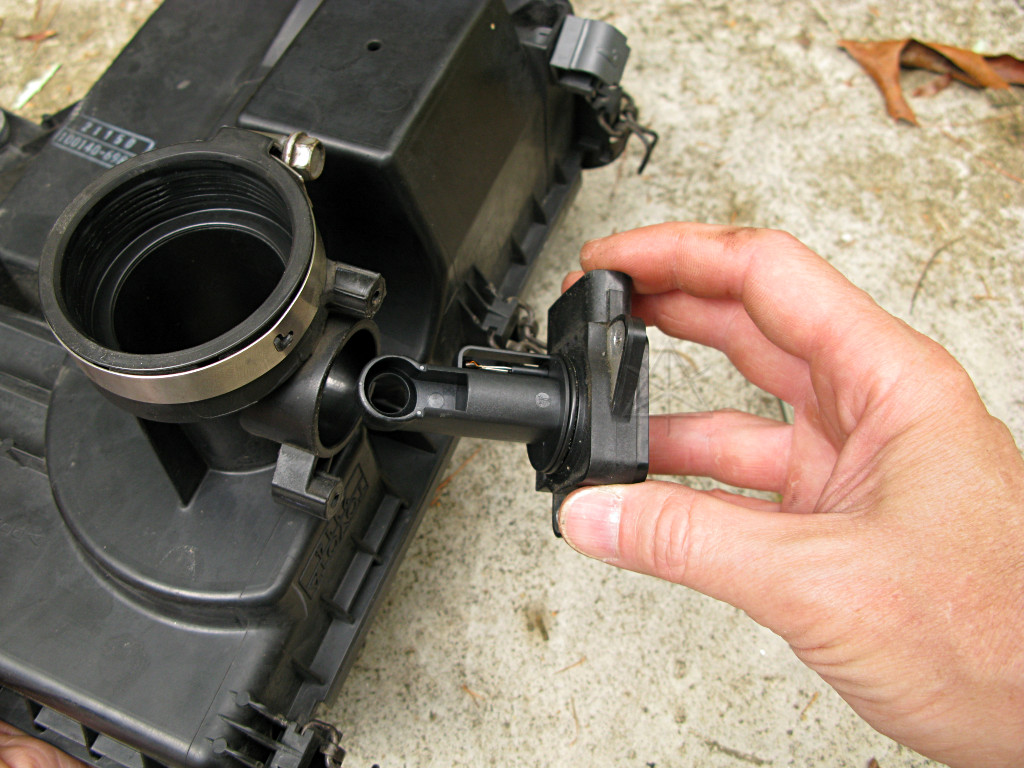
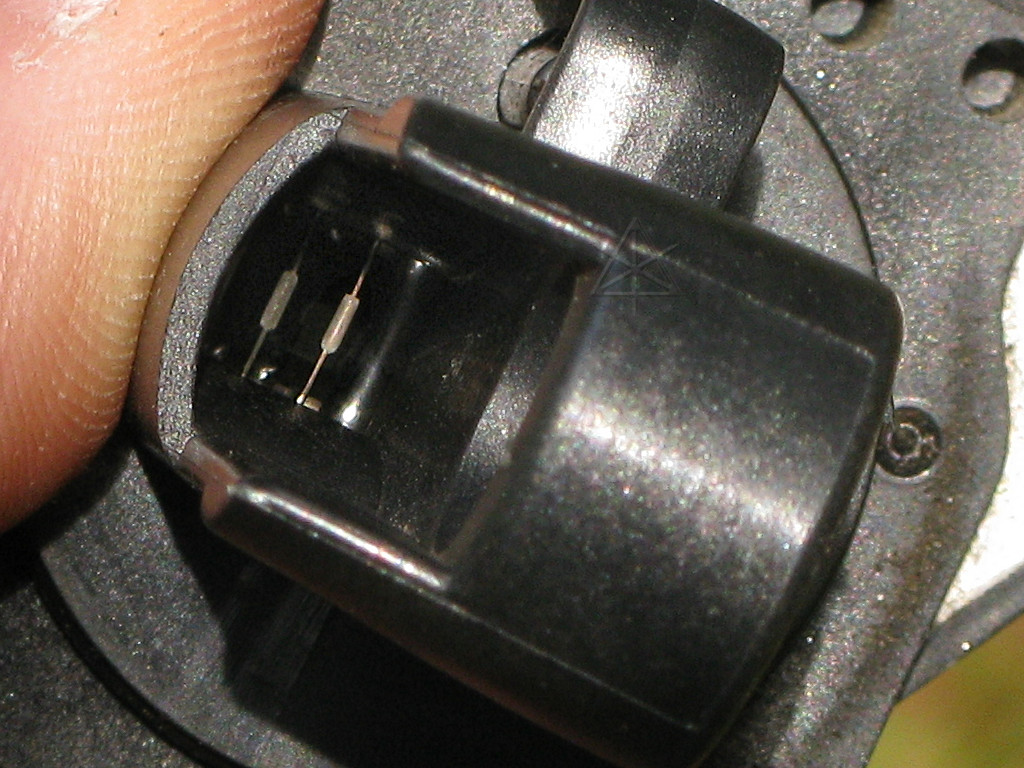
The sensor assembly is held in with two small self-tapping screws into plastic, so care to find the previous threading and fairly light torque when reinstalling is needed. |
|
A gentle twist and pull breaks the O-ring loose and the assembly comes right out of its chamber. If the O-ring looks dry, a very light coating of oil will help it go back in. |
|
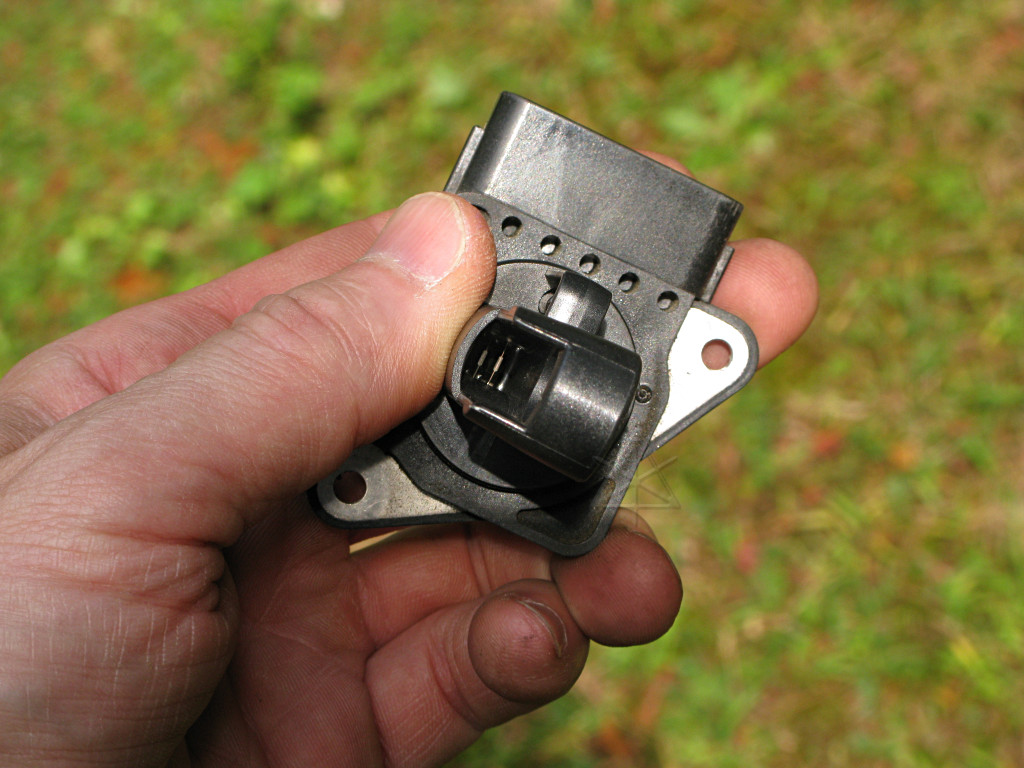
The mass airflow sensor uses two wires that are electrically heated, changing their resistance away from what it would be when cold. A small portion of intake airflow passes over them in different amounts and cools them back down again, and the difference in resistance can be sensed and turned into an airflow figure. I have no idea how this is made accurate and linear enough but the whole thing is very sensitive. Even holding a finger fairly high over the sensor opening when the engine is idling will cause it to run very differently and even cough and die, and there are known cases of a tiny bit of leaf or something getting into the passage and causing a complete no-start condition. Obviously a small bit of dirt accumulation on the wires can have rather profound effects on running as well, as the MAF is one of the primary determinants to controlling the air/fuel mixture. |
|
The air passage goes sideways for a little way, over the wires, and then
back toward the center along the bottom side. The heater elements are some
kind of encapsulated beads, and very delicate, so there's no way we want to
push any kind of physical object down here. It would be virtually impossible
to reach the back-side of the elements anyway. Here they *look* clean, but
even with a bright shaft of sunlight down there and high magnification and
enhancement from a camera crop it's hard to tell if it's clean or dirty
or what in there.
Anecdotally, however, I had an opportunity to inspect the MAF in a friend's 2002 Prius and its wires were *visibly* filthy. The car was throwing check-engine lights right and left but somehow still running. |
|
Here's one way to tell if the MAF might be dirty: inspect the intake air temperature-sensing thermistor next to the MAF passages. Here there is a slight but visible dulling of the finish on the encapsulant, on the side of the bead *toward* the airflow. |
|
Contrast that with the underside of the bead *away* from the airflow, which
still shows its shiny finish. A light wipe of the top side confirms that
the dulling was from dirt, and restores the same shininess there too.
So if this piece has accumulated a bit of dirt from the incoming air stream, chances are that the MAF wires have too. But now, how to go about cleaning those tiny, delicate and well-buried bits? A hint is right in this picture. |
|
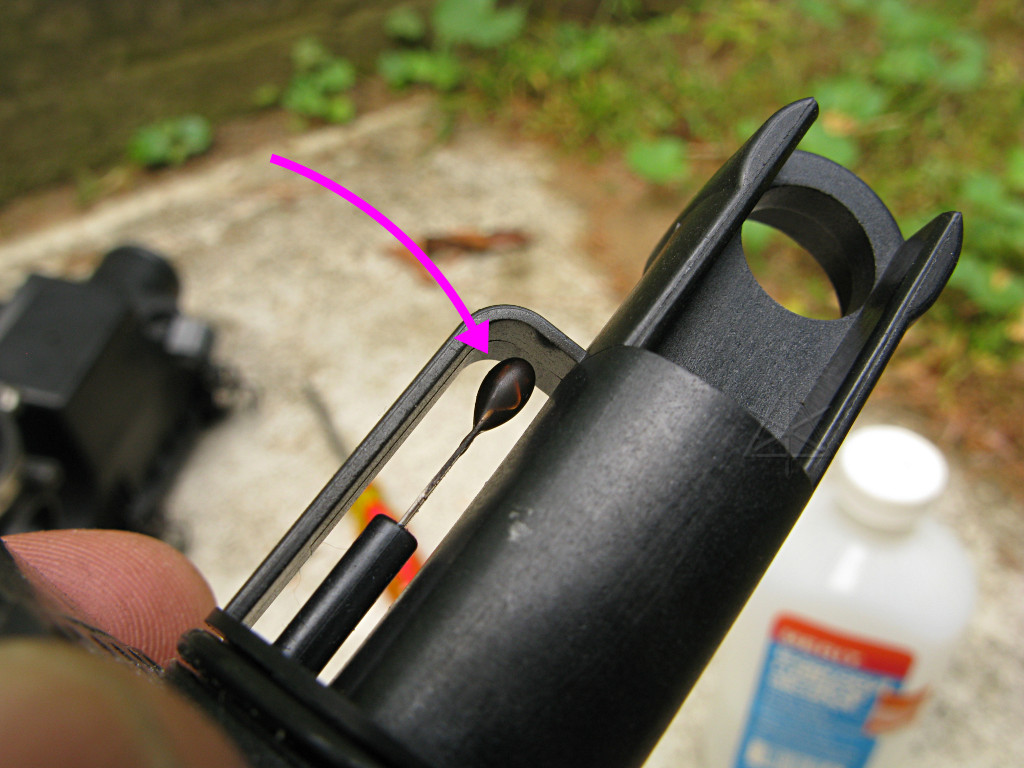
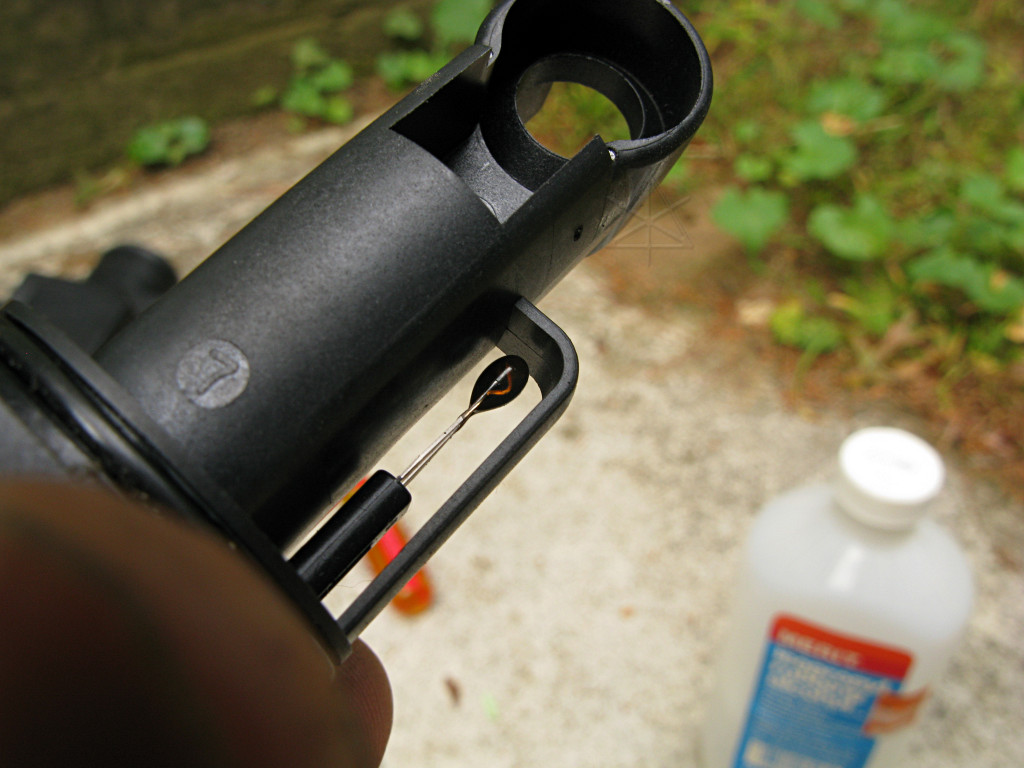
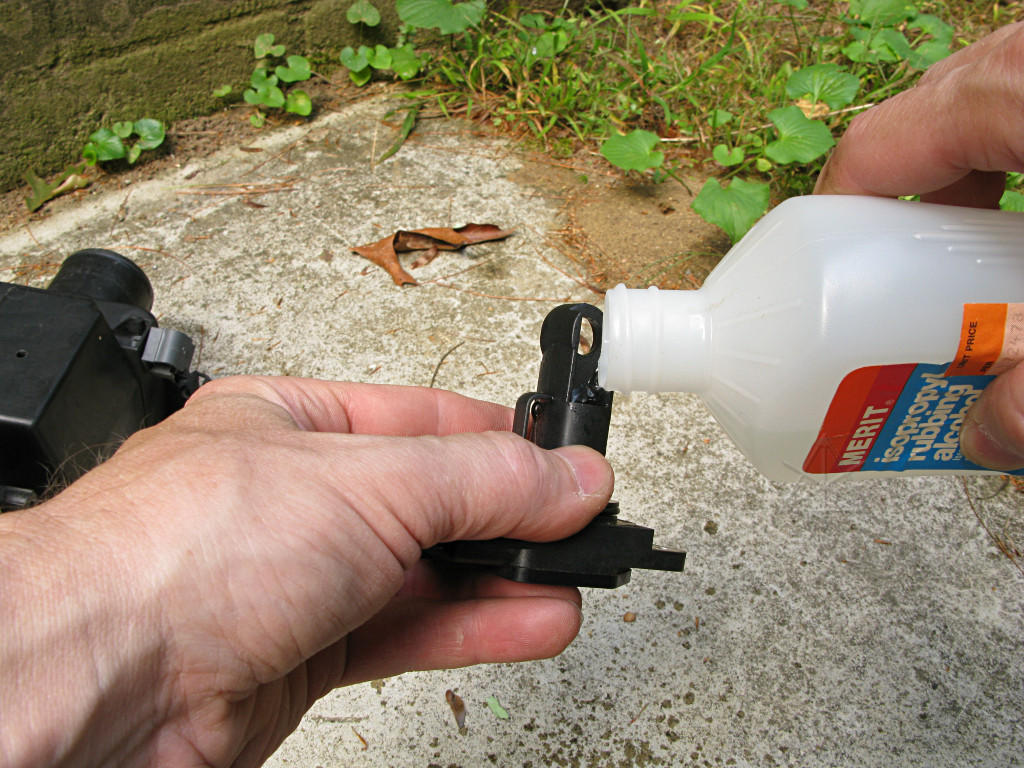
Answer: indirectly, using a fluid. A little isopropyl alcohol is dumped
into the MAF chamber and the unit shaken around a bit with fingers covering
the two openings as best as possible, and then quickly dumped out. Repeat a
couple of times, and presto, no more dirt on the MAF, and then we can put
everything back together into the car.
It's amazing to think how such a tiny thing could cause us to miss an important business appointment because the car won't go. Notice the frequent use of words like "gentle", "delicate", and "sensitive" where the MAF is concerned? Keep thinking those new-age thoughts during the reassembly process, and everything will be fine. Don't overtighten the band-clamp and crush the rubber air-box collar, either. |
|
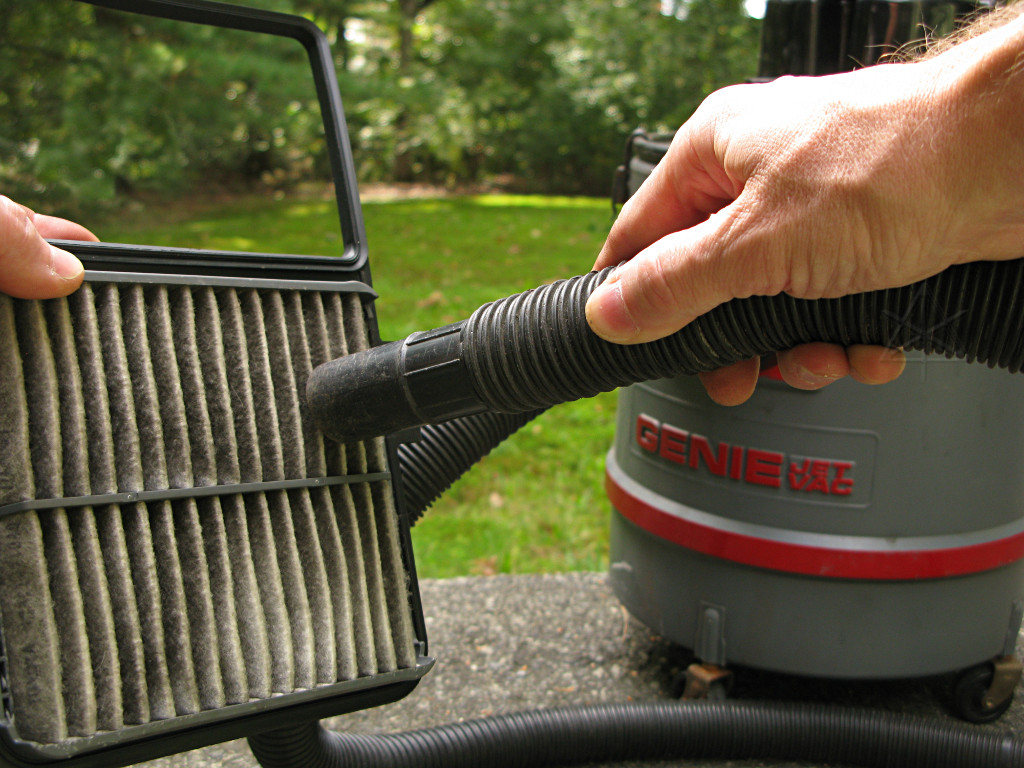
The air filter is given to be a replaceable element, but it can easily be
cleaned and reused. This is the second filter the car has had over its
entire lifetime, and hasn't caused any trouble with engine performance or
fuel economy. A few quick taps on the heel of a hand with the dirty side
downward knocks the bigger chunks out, and then the fine stuff can be
vacuumed out of the element [from the upstream side from whence it arrived,
of course].
During this inspection there isn't any particularly visible dust in the filter of the type that was floating around at the fairgrounds event, which makes sense since the car was shut down over much of it and really only ran in obvious dust clouds while following other vehicles out at the end. But a little battery-recharging run-time also happened over the course of the weekend, so who knows. The filter had another few thousand miles of roadtrip on it before that, too. And my pop-up canopy will probably never be the same again. |
|
With a filter and MAF in good working order, all the incoming air to the
engine should be A> unrestricted and B> accounted for.
But sometimes things are
less than ideal, and another possible cause of fuel-trim drift comes from
changes in the "unmetered" air typically caused by vacuum leaks or even the
lack thereof. Intake vacuum issues can have numerous causes because the
integrity of the intake tract depends on so many separate pieces; decaying
hoses and gaskets are some of the more common paths. There's a lot of
unhelpful mythology in this area, where problems are most often solved by
blind parts-swapping in favor of genuinely pinpointing the cause. Diagnosis
of fuel trims should proceed carefully in such cases, taking into consideration
which way the trims drift at low speeds or at high speeds, at idle or under
load with the throttle more open. Fortunately the Prius intake system is
not particularly complex, so the number of places to inspect is not large.
One often-overlooked item that can affect intake volume is the PCV valve, which at least one site in the references calls a "carefully controlled vacuum leak". The postive crankcase ventilation concept has been around since 1960 or so, and the related plumbing for it largely unchanged the whole time. Its job is to keep the unavoidable piston blowby gases from building up pressure in the crankcase, and use the engine's own intake vacuum to remove them and burn up stray leftover hydrocarbons contained therein rather than venting it all off to the outside air as was done in the old days. Thus, some amount of gas is almost always flowing through the PCV valve and contributing to intake flow *after* the MAF, thus technically introducing unmeasured "air" to the mixture. It's not a whole lot of flow and is self-regulated by running conditions, but a clogged or stuck-open PCV valve could still cause fuel trims to drift a bit. In the case of a clog in the PCV path, a little less air would enter the engine and fuel trim would thus have to dip a little lower than normal, especially at idle. That could be a warning sign. It is not good to have the PCV clogged because then the blowby gases from compression and combustion, a nasty mixture containing moisture and acids as well as volatile hydrocarbons, can rapidly degrade the crankcase oil and cause sludge buildup inside the engine. If *positive* pressure builds inside the crankcase it can actually blow seals and gaskets outward and start large oil leaks. Typical PCV setups have an air breather inlet tube to the engine, typically taken from the clean side of the air-box or anywhere ahead of the throttle plate, and an outlet tube that passes through the PCV valve and back into the vacuum side of the intake after the throttle plate. One quick general test for a working PCV valve is to pinch off the inlet hose and see if the idling intake vacuum pulls a slight vacuum on the whole crankcase, which can be tested for at the oil dipstick tube with a vacuum gauge or even a finger. Another test is to take out the valve and shake it; a healthy one rattles a little which indicates that the little pintle inside is still moving freely, but doesn't necessarily reveal if the spring is broken or not. Valve removal in the Prius involves pulling the cowl and unbolting a bunch of electrical harness stuff on top of the engine, so for the moment we'll just try to do a quick functionality test and maybe replace the valve at some later time if it even needs to be. | |

|
In the Prius the two hoses connect at the front and back of the throttle body
very near the butterfly, and to fittings in the valve cover. Unfortunately
it's almost impossible to pinch the inlet hose shut and not risk damaging
something, with very little working room between the engine and the inverter
and a big protective foam sleeve around the tube. But removing the upper
relay box and one bolt from the harness clamps allows opening up just enough
space to fish fingers in there and loosen the clamp and slide the hose off
the fitting. Now the crankcase intake fitting can simply be blocked off by
sticking a finger over the end.
The engine can then be started and idled as described in the easy inspection instructions without doing anything particularly special, and the intake fitting checked for vacuum. |
|
Here's a more formal check with a gauge, connected with the "suction cup" adapter that came with the MityVac simply held over the end of the barb. It takes a few seconds for the idle vacuum to pull the air volume of the crankcase down as far as it will go; here it's holding about 6 - 7 in-Hg and a close look at the big picture shows that the needle is vibrating a little in response to all the crankcase volume changes as the pistons are going up and down. Letting go produces a big whoosh of air into the breather to re-equalize, and air continues going into it afterward. So obviously, the PCV valve is flowing as it should. |
|
Further functional proof comes almost by accident: at some point in all this
dorking around with the system powered up, the hybrid battery SOC drifts down
to the point where the engine wants to start anyway and top it up. That's
not base idle as a slight charging load gets placed on the engine, but helps
confirm continued PCV operation. Here's the accidental part: continued
monitoring of crankcase vacuum as the hybrid system gets done topping up the
battery and the engine stops all by itself. The vacuum is *sustained* after
shutdown and leaks down very slowly, confirming that the PCV valve fully
closed itself against flow in the other direction [as it should] and that
the spring is working to move the pintle correctly.
So, to summarize -- PCV pulls light crankcase vacuum when the engine is running at low load, and *holds* that vacuum reasonably well after shutdown if the inlet tube is blocked off. For now I think there are no worries about the PCV here, and the new valve [that I actually have on hand already!] can get swapped in at leisurely convenience next time the cowl is off for some other reason. And I certainly won't have to document it -- Galaxee's how-to on PCV replacement in the references is a fine pictorial guide and my going through it again would be quite redundant. | |
|
However, all of the above doesn't actually seem to bring the long-term fuel
trim back up any appreciable amount right away, leaving me to think that
there might be something else going on. The air-fuel exhaust sensor itself
may be a suspect if the situation were to persist across all other checks, but
that seems to be another one of those virtually failure-free parts based on
collective owner experience. I'd be more inclined to suspect a slightly
drooling injector. Hauling out the scantool and doing some power-balance
tests would be one of the next steps to really get into some deep diags.
But a few days later I decide it's about time to dump in another bottle of Techron anyway, and around 70 miles after doing *that* guess what? Long-term trim right back to -1 or -2. Go figure. Either there was a little crud on an injector pintle or the whole thing was just a temporary fluke. Case closed for now. |
|
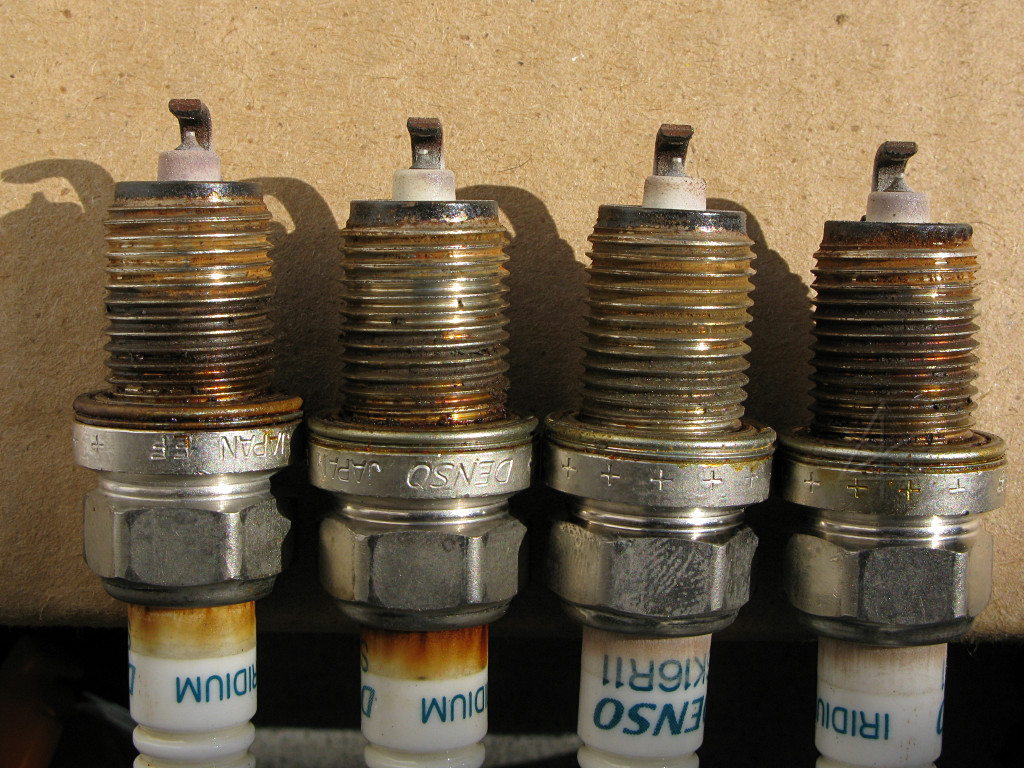
This is a small jump backwards in the overall timeline --
I changed the plugs a little after 90K, possibly a little prematurely but I
had a good opportunity in warm Florida sunshine to do it. These had been
removed and anti-seized somewhere around 50 or 60 K but still offered a little
strange-feeling spalling resistance while unscrewing out of the head; I just
torqued carefully back and forth and slowly worked them out. Contrast with
the pic near the end of the 50K inspection; the electrode ceramics are still
quite clean here. These plugs could probably go a bit longer but with the
new ones in hand, no real reason to try. The new ones also went in with
appropriate anti-seize so they'll be easier to get out again some tens
of thousands of miles from now.
While it's possible to get these out without cowl removal by having just the right length of socket extender, I opted to pull all the stuff in the way just to open things up more and allow freer inspection down the plug wells in the head. |
| I can't explain the brown bits on the insulator in #1 and #2, but we should remember that these engines have had occasional problems with water getting onto that big valley in the valve cover and then seeping down into the ignitor wells. They are well-gasketed and can withstand brief spray from engine cleaning, as long as the valley is sopped out afterward and the engine run up to operating temp to help dry things out the rest of the way. Otherwise there's no visible corrosion or gunk down in the wells or on the ignitors here, so no worries. | |
|
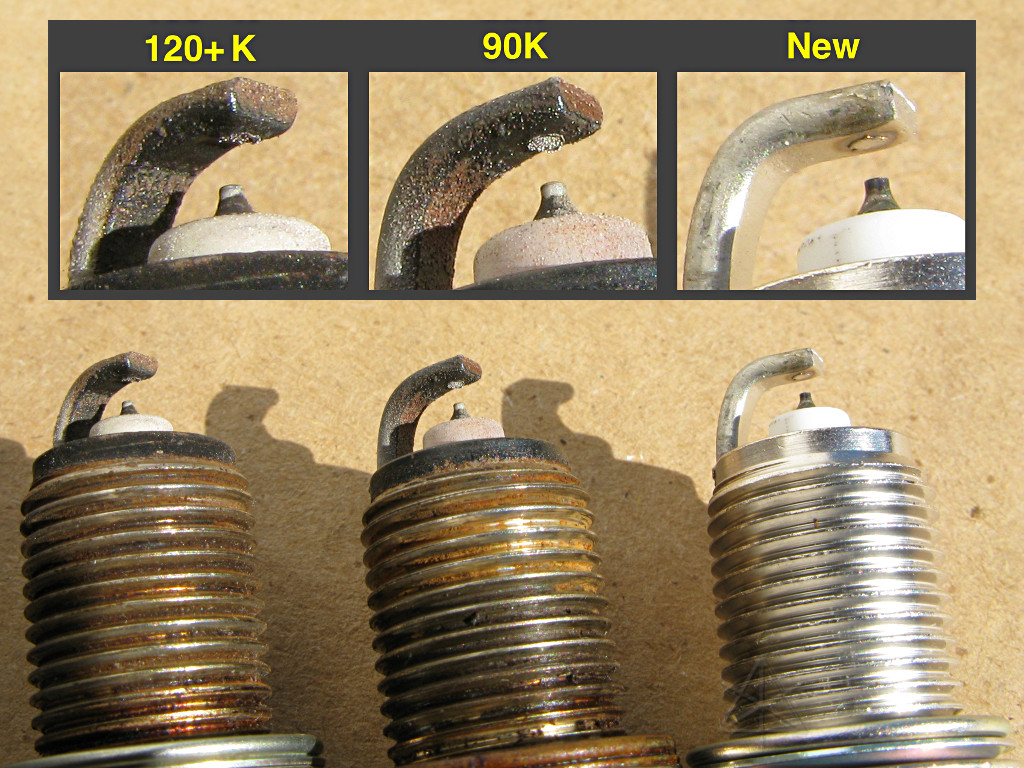
I had also done a plug swap for my buddy Jesse's '05 shortly before this, at about 122K on his clock, and hung onto his old plugs for comparison. So here we have plugs of various ages, and Jesse's possibly having been run a bit harder overall. The iridium patch on the ground electrode clearly gets pitted away over the life of the plug, and the center tip worn back. This changes the spark gap some amount over time, but nobody seems to worry about regapping these things. |
|
What's interesting about one of Jesse's old plugs is the effect of electrode
misalignment. The ground electrode hook got bent over a little too far
somehow and wound up placing the iridium patch not quite under the center
electrode, either during manufacture or careless handling by whoever put them
in. From the appearance of the shallow pit to the left of what remains of the
iridium, it's clear that some of the sparks were jumping to the base metal
rather than the iridium. So in this one plug we see the iridium-tip wear
right next to some indeterminate portion of what would be normal electrode
loss in a traditional plug. Given the distances visible here I'd think the
majority of sparks still went to the iridium, but that all could be influenced
by directions of airflow in the cylinder as the charge streams in and gets
compressed.
None of this was a problem; it still went "zap" and Jesse's car ran fine, it's just interesting to see some of the long-term effects. |
|
I moved this ground wire at some point in the past, from where it normally
stretches across space toward the radiator bracket. It happens to fit very
nicely along the changed path and still has a generous loop to allow for
engine movement, and in the process both end lug connections got cleaned up.
Solid electrical ground connections are important for many reasons, one of which we'll touch on when discussing coolants. |
|
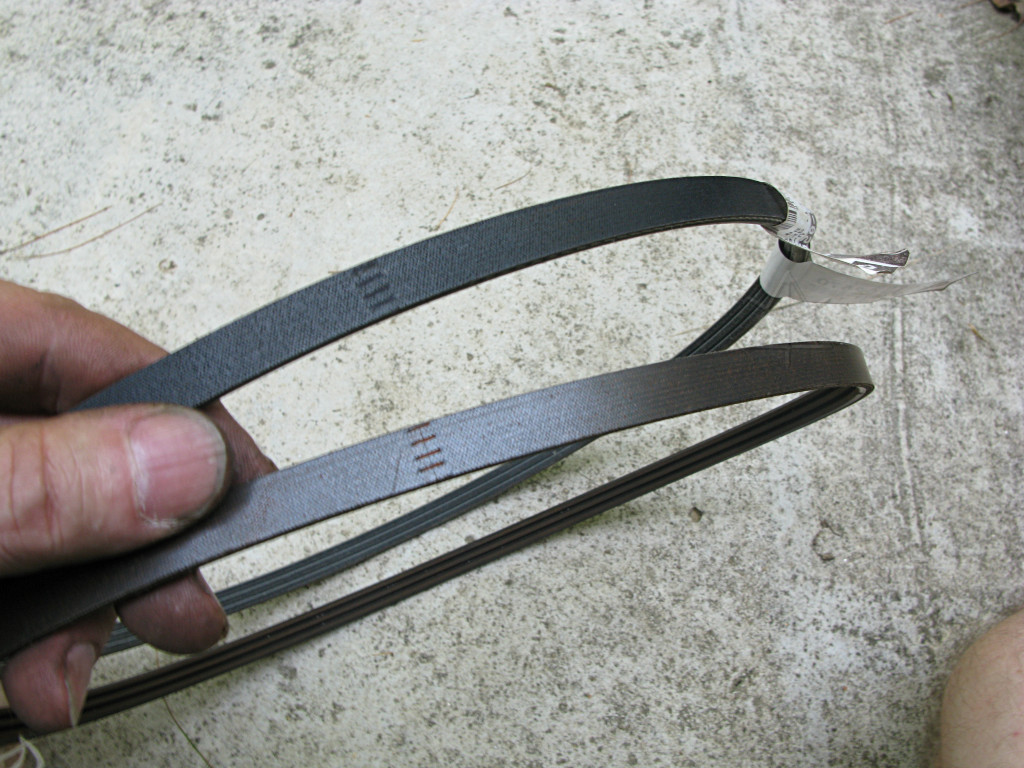
At 110,000 miles, I was still running on the *original* water-pump belt.
Nothing really wrong with it at this point, but I had already bought a
replacement belt back around 50K thinking that the original couldn't possibly
last this long, but last it did. It doesn't run under particularly high
stress, as the water pump is the only thing externally run by the crank pulley.
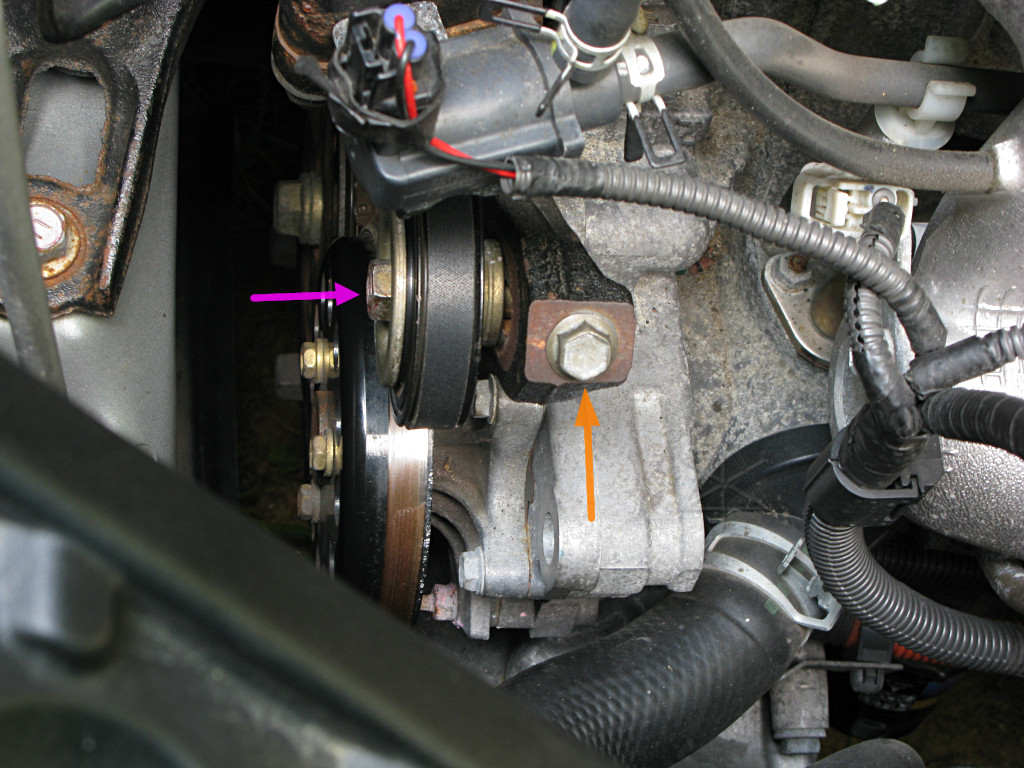
The belt is easily removed once the intake snorkel is out, by simply loosening the idler pulley and removing belt tension. The nut at the purple arrow is the main mounting hardware, and the bolt at the orange arrow is the tensioner. It's useless to fool with the tensioner until the main shaft is loosened up so the whole idler assembly can slide. |
|
The old belt is a bit glazed on the back from where it contacts the water pump sheave and maybe not quite as thick as the new belt, but is still in serviceable shape with no real signs of degradation, cracking, fraying, etc. Still, the new belt goes in to replace it and the old one becomes the spare that rides around in the back. |

|
The parts of the idler pulley. The pulley itself has a very high quality sealed ball-bearing in the middle, which still feels like new after all those miles -- and given the relative circumferences of what the belt passes around, this bearing goes around *many* more times than the engine does. That's pretty amazing longevity. I haven't figured out who makes the bearing. |
|
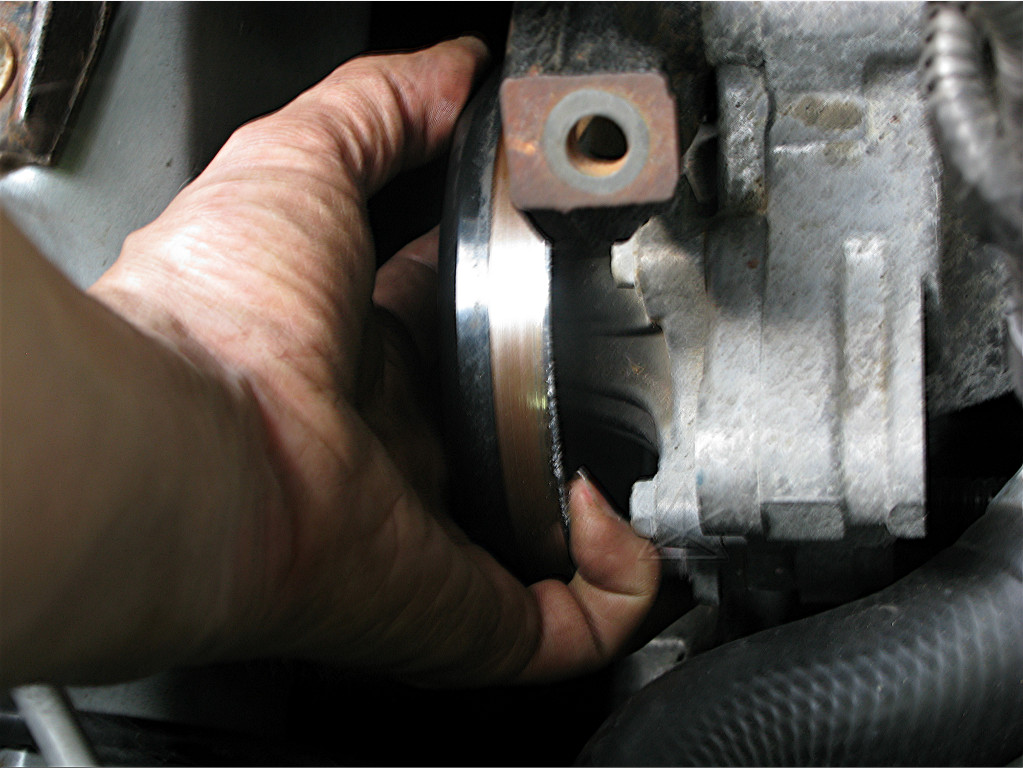
Having the belt out gives the opportunity to check the water pump bearings
and seals, just by the way the pulley feels. The bearing feels nice and tight
here, with no play and a hint of solid "rubberiness" from the seal friction
as the sheave is turned. The seals in this one and in many other Priuses do
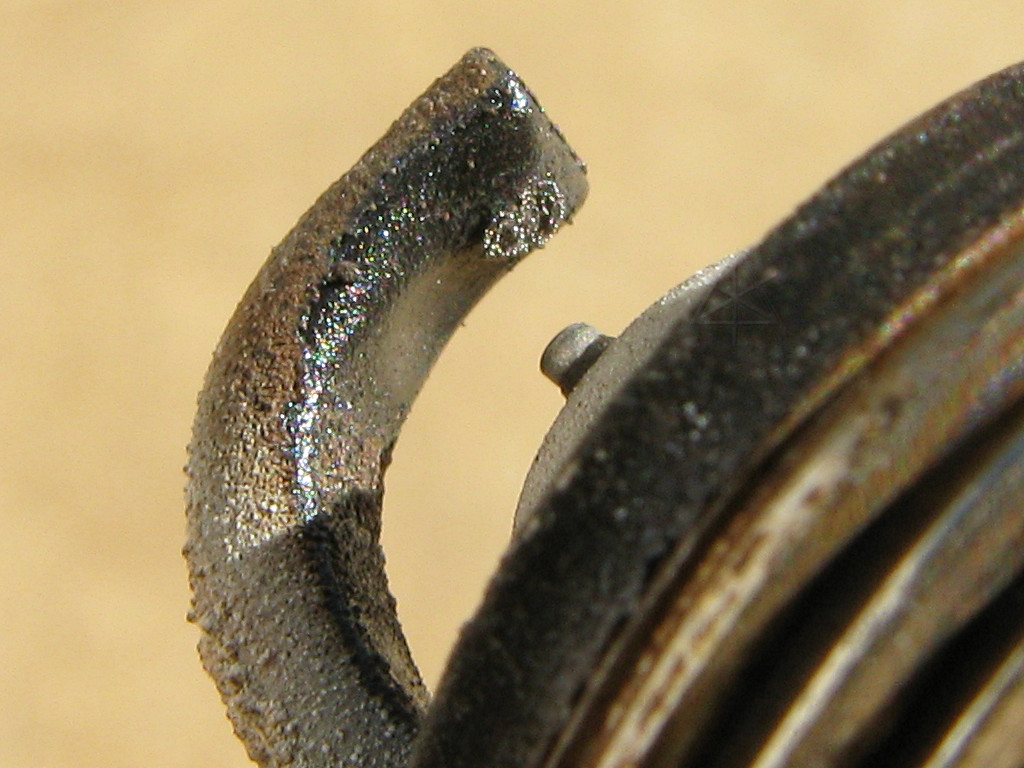
weep a tiny, tiny amount of coolant, giving a thin line of pink crust around
the edge and a subtle line of flung-off coolant on the fiber hood-liner above.
This is *normal* for many of the cars; mine's always been doing it and there
are other forum posters who have observed the same. I think I've topped up
the coolant overflow tank maybe twice in the entire time I've had it, and then
only with a couple of ounces. That doesn't really count as a leak.
If a tiny amount of seepage keeps the seals wetted with coolant, that's probably way better than having steel running against dry rubber. |
| On the other hand, I've heard of other owners needing to replace the engine water pump around or even before 100,000 miles. Some of those could have been from misinterpretation of the slight weeping; some could be genuine wear-out. My private theory is that it has almost everything to do with belt tension -- it is generally pulled *way* too tight at the factory or service centers, placing a high side load on the pump bearings. I always run this belt a little looser -- not so loose that it's flapping, but such that the pump sheave can be turned by hand against the belt friction relatively easily. A somewhat energetic finger-tight at the tension bolt seems about right, before the main is locked down. Again, not a lot of force is needed to run the pump, so the belt is unlikely to slip even if less tight than usual. And the long-term load on the water pump and idler bearings is much less. | |