Prius 100,000 mile maintenance

  Part 1: Overview;   tires/brakes
  Part 2: Underhood
  Part 3: Headlights: the Big Schnoz
  Part 4: Inverter pump
  Part 5: Coolant testing
==>   Part 5b: Engine coolant
  Part 6: Transaxle / driveline, references


At long last, engine coolant

This part was actually performed much later -- at somewhere over 150K on the clock, since initial testing showed a bit of life still left in the engine coolant. But now it was probably time to get it out of there -- just a simple drain and refill, without worrying about those frequently-upsold "flushes". As noted in the previous studies of coolant chemistry, a flush isn't needed if we're about to do a radical refresh on the additive chemistry anyway.

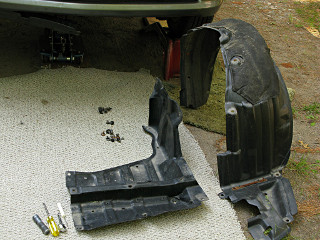
splash guard and fender liner out Once again, these items have to come out from around the front end and wheel, invariably taking a couple more of those little plastic push-pins with them ...

access to underneath ... to gain access to the coolant drain taps at the storage bottle and radiator. The fender-liner actually doesn't have to come completely out, as it can easily bend back enough to give access to the thermos, but removing it gives the opportunity to clean out behind it and dump a few years' worth of accumulated crud that lodges in there.

Astoundingly, the lip of the wheel-well quarter panel and the rest of the area in general is showing virtually no rust, even around the liner mounting holes. Various other parts around the car are definitely corroding at interestingly different rates, but the body steel in general and its paint treatment seem really robust against it. That's certainly not what we New Englanders usually expect over seven of our salt-soaked winters!


radiator drain area The radiator drain [pink arrow] is actually a little hard to reach with the other stuff passing right by it, but removing the two bottom fan bracket bolts [green arrow, and a corresponding bolt near the other end] allows the plastic piece to bend away far enough to ease getting a hand up to the drain tap. It also helps to remove the hose clip I'm holding from the fan frame [yellow dots show where it comes from], which isn't easy as one of its release tabs is quite hidden and some sort of hook tool is needed to reach around and depress the inner one.

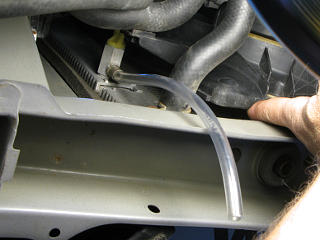
short hose on radiator drain Now it's relatively easy to push a short hose extension onto the drain so it won't drool coolant all over the lower support when opened.

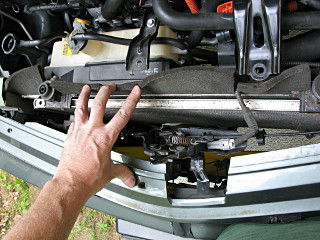
top brace removed While not necessary, removing the entire upper radiator brace allows seeing what's under here. This involves four fixing bolts, three more to free up the hood latch, disconnecting one of the horns, and a couple of brackets including both front ones for the inverter. Then the brace can be sort of ducked out from under the brackets while lifting the inverter a little [it's heavyish] and removed.

radiator bleed plug With the brace gone, the radiator bleed plug at the opposite end from the filler cap can be examined closely. It's a simple thing that lifts a small O-ring out of a hole into the radiator channels. Unfortunately as soon as the O-ring comes clear, coolant will leak up around the plug threads as well as going out the little side pipe -- not a particularly good design. Even if the idea is mostly to to let air out as the system is refilling, it's good to have this exposed to facilitate seeing and catching any spillage.

stupid foam space-filler that doesn't The radiator assembly is topped by these glued-in slabs of foam which are supposed to stand up straight and block airflow through the gap under the upper brace, but they evidently take so much wind blast that they have very little hope of remaining upright. And this is after I've had my top grille slot completely blocked for years now, even in summer. The vast majority of air comes in through the bottom grille anyway.

anti-seize on bolts Ignore the yellow and white Coroplast here -- that's my movable blocker for the *lower* grille that gets flipped up and tied in for winter.

With everything apart that's coming apart, the opportunity is taken to go over all the fasteners, clean them off, and apply fresh anti-seize and run them in and out of where they thread a couple of times to get rid of the rust. Some of these bolts have never been out yet, so now they'll be easier whenever the next time comes. As mentioned before, some of these parts are rusting pretty heavily and some aren't, but nothing's corroded quite to the point of hopeless yet.


draining expansion tank Now we tackle the coolant itself.

Draining the little bit out of the expansion tank is easy; the hose to it just pops off the filler neck and can be lowered into a catch receptacle. As this coolant does circulate back and forth into the system a little bit at each warmup/cooldown cycle, it should be considered equally aged as what's inside the system.


draining from near thermos Draining starts at the thermos tap, since it's the lowest point and there's clear area under it to catch fluid. It runs freely for about one two-quart bottle's worth, and then slows to a trickle. I figure that's because some parts of the system are closed off behind the three-way valve and/or various gravitational dead-ends associated with the storage system and maybe the heater core.

I haven't opened the other taps yet, and with a listed capacity of over 9 quarts there's *gotta* be more in there than this.


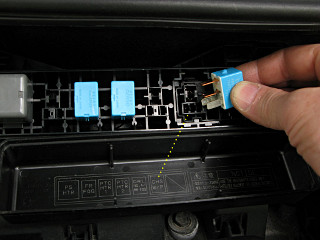
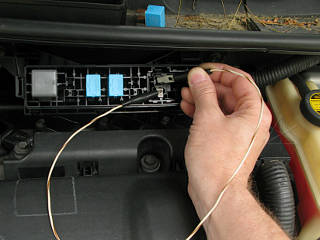
CHS water pump relay bridging to activate pump
One tactic for trying to push fluid around in the system is to run the storage-tank pump, which should at least help flush the plumbing around the thermos. This is the pump that we hear run at startup and sometimes at shutdown for a few seconds, and that also often gets really screechy in cold weather. Thanks to Levi Smith and several others who logged their own observations in a Priuschat thread about engine coolant change, we know that it's easy enough to bridge the Coolant Heat Storage [CHS] relay output contacts and activate the pump for brief bursts. The relay is in the little auxiliary panel mounted to the middle of the cowl above the engine.

3 way valve diagram

However, which way the pump pushes fluid depends on the position of a movable three-way valve in the midst of all that plumbing, that governs whether coolant is sent to or from the engine, thermos or the entire system. Of some note is the fact that this whole storage system doesn't exist on the non-US-market cars from '04 to '09, and Toyota has given up on this in favor of exhaust heat recapture in the third-generation Prius.

By the time I start messing around with this, the sound of the pump pretty much indicates that the fluid level is already below it as it's just trying to grab air and spinning much faster than normal. It seems generally recommended [and supported by various scantools] to not run the pump continuously for any longer than about 30 seconds in general; of course if it's not moving fluid anymore then there's no point in running it at all.

At a couple of points I notice a little steam coming off what's draining as the thermos empties, but what's coming out is not actually all that hot after an overnight sit. The service manuals do warn about potential scalds from the stored stuff, however.


OBD-II water-valve activation screen In an attempt to command the three-way valve to different positions and maybe let more coolant out of parts that might be blocked off, I fire up the scantool and the car [to IG-ON only, we absolutely *don't* want to run the engine in this state!!] and start sending valve actuation commands. The scantool's database doesn't quite match the supposedly three possible positions the valve can be in, but as I try each of the five commands I can *hear* a low growl of the valve turning so I know it's doing *something*. [I'm not bothering to tap and monitor the valve's feedback voltage to see where it's landing, but I could.] For the next several minutes I fool around with changing valve position, running the pump to see if any more liquid has flowed to it, squeezing hoses, repeat. All of this is fairly inconclusive, and probably unnecessary in the long run.

For the record, the "water pump" actuation command doesn't actually work, even with the relay reinstalled. Easier to just short the contacts. On the other hand, this might be talking about the auxiliary heater-core pump instead for all I know -- the information that Toyota gives [nay, *sells dearly*] to scantool makers is rather sketchy.


engine block drain stopper At this point I've also gone after the radiator drain, from which I get almost nothing, and the engine-block drain on the back below the exhaust manifold. So Levi et al were right about the radiator drain -- don't bother! And this is all I get out of the engine block -- probably the little bit left in the bottom of the cylinder jackets, that didn't go out the front because of the combined tilt of the engine mounting and the whole car as it's up on the ramps. The drain plug looks like this -- as it has to withstand higher temperatures, it's not an O-ring type of valve but a metal-to-metal valve seat.

... waiting ... Bottom line is that it just takes a *long* time for the system to drain. I suspect that the three-way valve doesn't seal perfectly and that fluid can eventually find its way through it regardless of position -- it's basically a traffic cop to direct the majority of flow direction, not to hard-seal parts of the system off from each other.

Thus, I don't bother trying to open up any hose attachments under there either, as a relatively miniscule amount of liquid would probably be inside. Wiggling them around and pushing upward here and there gets a couple more drops out of the drain, but nothing significant. By re-sealing the fill cap and bleed plug and the other drain points and then squeezing both radiator hoses at once, I can force out a few more little spurts of fluid. Remarkably similar to how we perform various bodily functions...


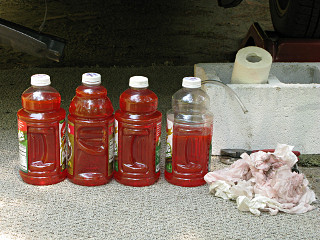
seven+ quarts obtained In all I obtain a little over seven quarts out of the system, plus whatever soaked into the many paper towels I've sopped up various spills with.

dip test The overall condition of the coolant is still almost passable, but the pH is gettin' down there a little. Still 50% glycol according to the end pad, so there's been no differential evaporation.

In fact, I've only added maybe a cup of coolant to the reservoir over the entire time I've had the car. And the tiny bit of pink crust that used to show up on the edge of the water pump pulley hasn't even been visible for a while. As mentioned before, that's normal pump shaft seal weepage under pressure and is often MISdiagnosed as a failed water pump. If you've got that minor spray line of pink stuff on the hood liner and/or intake snorkel but can't find actual puddles of coolant in the under-engine shrouds, again, don't worry about it.


fighting the hose clamp off While I have no reason to suspect anything amiss with the thermostat, I at least want to take a look at it as long as the system is empty. The spring clamp around the hose is *very* strong and resists the efforts to expand it enough to slide it away from the fitting, but I eventually manage to wrestle it off there with my fingers intact. Even with the air box off, in the somewhat confined space I can't squeeze it enough to hook the obvious latch tab through the keyhole that's supposed to keep it sprung open.

setting the spring-ring in a vise the trap is set
But once the clamp is out of the car, I can get the thing into a vise and compress it down far enough to latch open. But I have to leave room for the tab to come through the hole, so it's right on the hairy edge with a lot of force and the potential to jump right out of here -- like cocking a bear trap. We're talking safety goggles and a fair amount of caution about finger placement during this process, especially at the last step when leaning it over to move the tab into the narrower slot. Finally, the trap is set.

I assume that assembly workers in the factories either get these clips in a sprung-open configuration or have a tool handy that does this for them.


thermostat looks fairly clean A batch of trapped fluid annoyingly spills out as soon as the hose is disconnected, and a little more is still laying inside the tilted-up fitting to mop out. Around here and leading over to the water pump is probably one of the dead-end low spots that will retain fluid no matter what you do. But eventually I can see the thermostat, and despite a little surface rust on the movable piece it actually looks pretty clean. A finger wipe doesn't pick up any loose crud or deposits, and I already know that the little "jiggle valve" [see below] in the disc moves freely. In fact this brief glance into the innards of the cooling system shows it as quite clean in general, so I'm not going to worry about the thermostat until I start seeing some variations in steady-state engine temp. There's no sign of hose degradation either, inside or out.

The hose and clamp are put back on, and a screwdriver used to unlatch the clamp hook. *Snap!*


ready to fill, bleeder hose hung high Everything down below is closed back up, and it's time to start refilling. I've got a funnel that fits in the filler neck fairly tightly, and paper towels wrapped around anything likely to leak. A tube is attached to the bleeder port and run up high so air can get out but fluid won't spill; this becomes important as several times during the filling process the SLLC I'm pouring in backs up into both the funnel and the tube and has to be "worked down".

In general, the refilling process is sort of a slow pain in the ass similar to the draining process. Add some coolant. Hit the CHS pump, which may or may not pull the level lower. In the early stages I can hear the pump working on some mix of air and fluid, taking "bites" at the coolant as it gurgles its way into that part of the system. Gently squeeze the big hoses [not hard enough to make fluid fountain out of the radiator neck!] to try and push more bubbles out. Close the cap and bleeder and squeeze the right and left hoses more briskly, both alternately and together, trying to coerce more bubbles to the top of the system. Open up again and repeat. The tiny clicking heard from the area of the thermostat is from the jiggle valve, a small deliberately designed penetration of the thermostat disc precisely to allow coolant to flow back into the block and air to escape.

Eventually I get about a gallon and a half in and it's just not taking any more, so now it's time to start the engine and let it idle so the mechanical water pump helps push fluid around. The suggested "inspection mode" isn't needed for this, as idle is easy to achieve in normal operation. This also opens the three-way valve to the heater core, which has to have air purged out of it too. For a faster warmup, a little force-charging can put more load on the engine. The point is to let the engine come up to its normal 85 degrees C and start opening the thermostat. It is critical to monitor the engine temp at that point to make sure it STOPS rising -- I can do this with my temp gauge but a scantool or a Scangauge can show that too. The three-way valve also moves to the "whole system" configuration at some point after full running temp is reached, so in theory the water pump will be sending coolant through everything including the thermos at that point. The radiator fans may or may not come on during this -- if they do that means the engine has gotten quite a bit hotter than the opening temp of the thermostat.

It also seems to help to run the cabin heat at "max hot" and vary the fan from high to off and back. While coolant generally goes through the heater core all the time and there's no on/off valve for flow thereof, there's an auxiliary electric pump that circulates between engine and heater-core when the engine isn't running [e.g. when you're back in Park] but cabin heat is demanded. And feeling lots of heat coming out of the vents helps confirm that the heater core has coolant going through it. Unfortunately this also tends to pull a lot of heat out of the engine block and close the thermostat again, so more running/idling may be needed. [After all, the heater core is basically a second radiator.] The bottom line is that just trying to cycle all possible parts of the system several times seems to be the best way to work the remaining air out and allow adding more small quantities of coolant.

  • Engine running, heat off, build up full heat in the block
  • Engine running, heat max, send coolant through heater core
  • Engine cycling, heat max, work electric heater-core pump
  • Periodic hits on the CHS pump and various hose-squeezing during all of this
All this thrashing *will* waste a lot of gas, as a ton of excess heat is being thrown away without the car going anywhere.

Eventually the system seems to be as full as it's going to get, and the CHS pump sounds normal and clearly isn't chewing any more air pockets. As the system cools down its overall pressure will lower, so we want to also have some new coolant in the reserve tank for it to pull in. From here it's going to take a few normal warmup/cooldown drive cycles to purge any remaining air, including normal runs of the CHS pump at startup and shutdown, and eyeballing the radiator-neck level [but do not open with the system hot and under pressure!] and adding more tiny amounts of coolant as needed.

Again, I refuse to use an "air lift" or other evacuation device on this due to concerns about collapsing thin-walled radiator tubing or damaging other parts of the system. Not that I've got shop air handy anyway, so that's sort of off the table regardless. From what I've seen when it's been done to Priuses anyway, there's still some significant air "burping" left to do no matter how much suction was pulled before letting fluid in.


tilt entire car to bring bubbles to cap After a couple of days of normal operation and rechecking the coolant level, it seems that the system is pretty much full. But if I alternately squeeze the radiator hoses I can still hear a few bubbles sloshing back and forth inside the radiator, so I'm not quite out of the woods yet. Noting that the filler neck and bleed plug are roughly at the same level, maybe tilting the entire car to let the air head for the filler neck is the right answer.

This seems to do the trick: after arriving home from a drive, the car goes up on the jack and a firm squeeze given to both radiator hoses while the system is still under "hot" pressure. And I hear a little "blblblurk!" as the last of the air passes out the filler-cap relief valve and goes into the reserve tank. Now when I squeeze I don't hear any sloshing, just the jiggle valve clicking. Yay, finally done.


Go to Part 6: Transaxle, references, and a little humor


_H* 110619